Artists, athletes, musicians, and dancers all share something in common: They practice warmups before they dive into their crafts.
So take a moment to reflect on this. Do you warm up before you dive into your watercolour paintings?
If not, I recommend that you incorporate warmup exercises into your creative routine from now on.
“But why?” you might ask. “I just want to paint! What are the benefits of warmups?”
Watercolour warmups make you paint better because these exercises help you develop better hand-eye coordination. When the muscles in your fingers, hand, wrist, and shoulder are warmed up, it’s easier to lay down brushstrokes. As a result, warming up for a period of time improves your overall performance, so it’s easier for you to tap into the flow of painting.
If you don’t warm up, it’s often harder for you to apply techniques and brushstrokes properly because your brain and hand haven’t synced into coherence yet.
But don’t worry! Warming up is actually very easy if you know what exercises and skills to focus on.
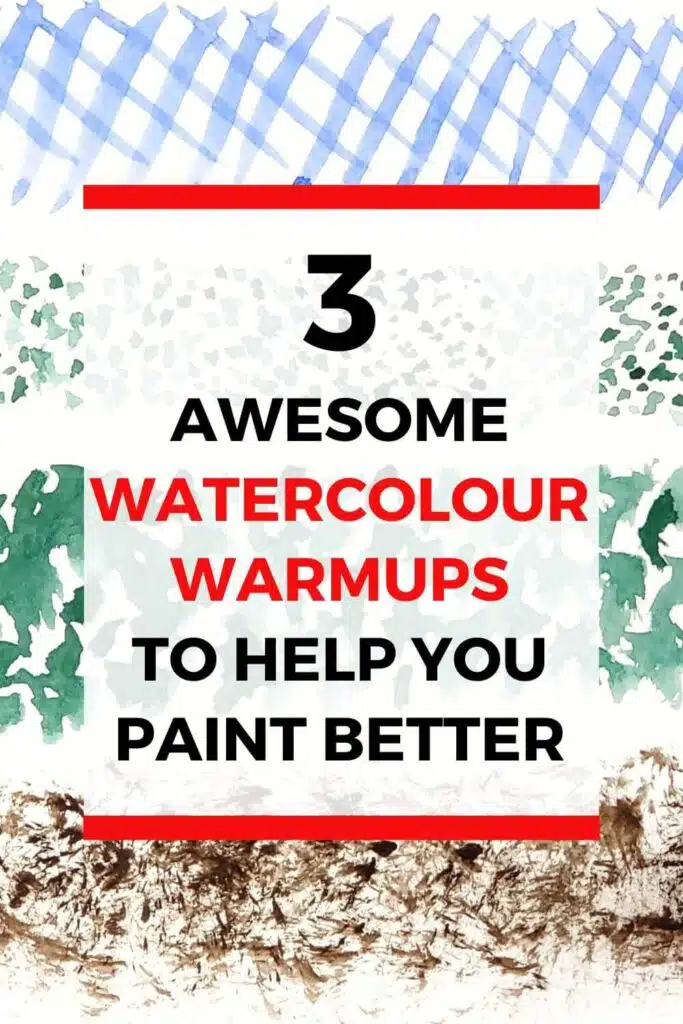
To help you get started the easy way, I’m sharing 3 awesome watercolour warmup ideas that’ll set you up for success with your paintings! In this blog post, you learn:
- How to practice various brushstrokes
- How to paint simple textures
- How to do quick value studies
By the time you’re done reading, you’ll be able to do these easy watercolour warmups in order to improve your water control and paint-to-water ratio skills.
DISCLOSURE: This page contains affiliate links. If you make a qualified purchase using any of the links, I’ll earn a small commission at no extra cost to you. I appreciate every sale because it allows me to create free content to promote the growth of this website.
Table of Contents
Materials You Will Need
Before you begin, make sure you have all of the following watercolour art supplies:
Watercolour paints (I’m using White Nights Watercolour Paints)
Watercolour brushes (I’m using Silver Black Velvet Brushes)
Watercolour paper (I’m using Arches Cold-Pressed Paper)
Mixing palette (I’m using Meeden Porcelain Mixing Palette)
2 jars of clear water
A cloth or some tissues (optional)
This blog post is perfect for you is you prefer to read text. But if you’re a visual learner, then check out the video below to watch a step-by-step demonstration of all these watercolour warmup exercises.
Watercolour Warmups #1: Brushstroke Practice
In my opinion, the best watercolour warmup for beginners is practicing different kinds of brushstrokes. It’s easy and rather straightforward to do.
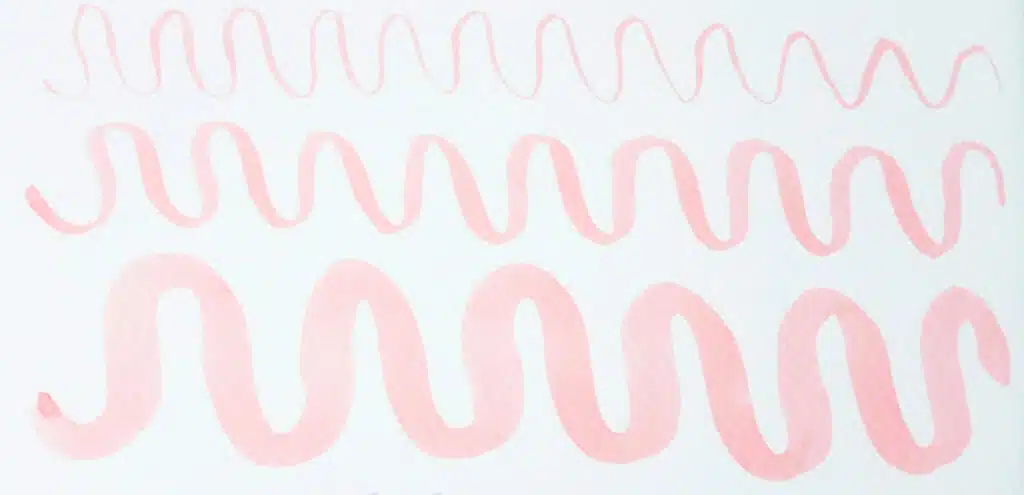
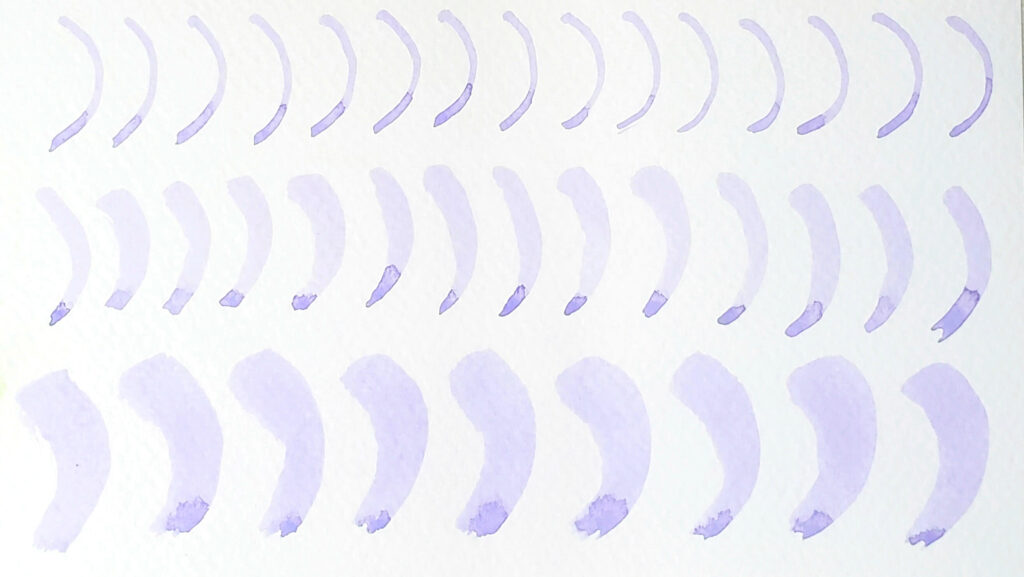
The first brushstroke warmup focuses on painting thin lines, thick lines, and waves made of both think and thin lines.
- First, using a medium round brush, load up your brush with a pigment of your choice. Start by creating a bunch of thin lines next to one another. Apply light pressure onto your brush and focus on using the tip of your brush to make the lines as thin as possible. Paint a dozen of these lines quickly and loosely, and don’t overthink the painting process.
- Second, move onto medium brushstrokes and paint them beside one another on the second row. Apply a moderate amount of pressure to your brush to create brushstrokes that are medium in size. Paint a row of these brushstrokes side by side as quickly and effortlessly as you can.
- Third, move on to thick brushstrokes. Apply firm pressure to the belly of the brush so that the bristles fan out, thus creating thicker lines. Paint tons of these lines side by side on the third row.
- Fourth, load up your brush with more pigment. Starting at one side of the paper, create a steady wave across the paper by moving the brush in gentle up and down motions. The line should be painted in one long, fluid motion.
- Last, repeat step 4 two more times to create a medium wave and a thick wave on separate rows.
As you can see, your watercolour paper should be filled with dozens of brushstrokes of various thicknesses. The waves look the most dynamic because they combine the soft elegance of the thin lines with the boldness of the thick lines.
Great job! Now let’s do another warmup exercise to practice more dynamic brushstrokes.
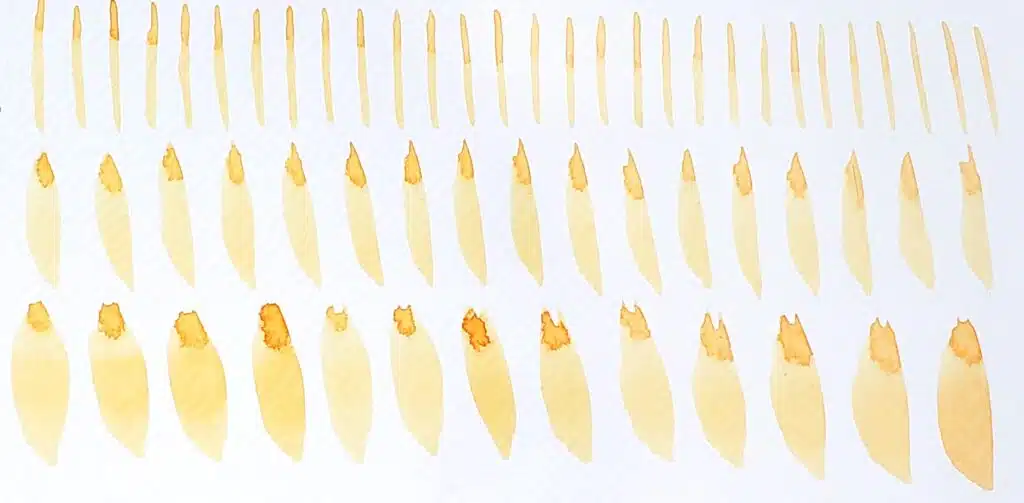
- First, grab your medium round brush and load it up with some pigment. Using light pressure and only the tip of your brush, paint a tons of C curves on your paper so that each line looks like a delicate blade of grass.
- Second, apply medium pressure to your brush and paint another bunch of C curves on the second row. But this time the brushstrokes should be thicker and look similar to the shape of bananas.
- Third, apply firm pressure onto your brush and paint with the belly of the brush to create a third row of C curves. These brushstrokes should be thick and bold, so the lines will look like plump jumbo shrimp.
Congratulations! You’ve just completed your first set of watercolour warmups!
How does your hand feel? If your hand feels loose, the brushstrokes felt smooth, and your mind feels relaxed, then you’re on the right track.
And if not, then don’t worry. Just keep practicing until you find your rhythm!
Warmup #2: Painting Watercolour Textures
This second watercolour warmup exercise focuses on painting 4 textures by using the following techniques: cross hatching, stippling, dabbing, and dry brushing.
To create texture using cross hatching, do the following:
- First, load up your medium round brush with some pigment. Start off by painting a row of diagonal lines. Use medium pressure to create lines that are balanced and of equal size.
- Second, use medium pressure to paint the same set of lines, but this time paint them in the opposite direction so that the diagonal lines cross over the first set of lines. Your row should look like there are many tight Xs sitting next to one another to create a hatched pattern.
To create texture using the stippling technique, do the following:
- First, load up your medium round brush with pigment and then hold your brush vertically. The goal is to use the fine tip of the brush to paint dozens upon dozens of small dots next to one another.
- Second, move your brush across the paper to create a stippled rectangle. To do this, make sure the stipples are all the same size, and the dots should be tightly packed next to one another. That being said, make sure to leave some white space so that there’s breathing room for the texture to show through the pigment.
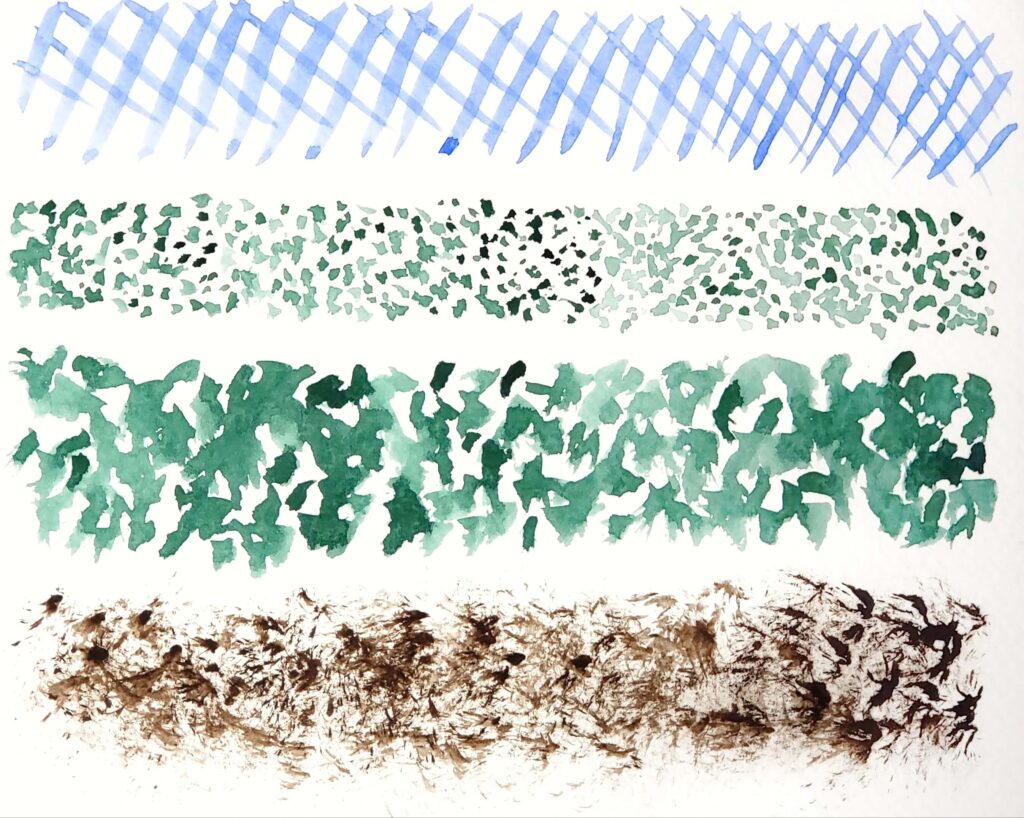
To create a texture using the dabbing technique, do the following:
- First, load up your medium round brush with some pigment. Use some pressure on the brush and dab the bristles randomly on the paper to create a cluster of small paint blobs. Make sure the dabs are close to one another, but there should still be some white space between the dabs.
- Second, move the brush across the paper to create a dabbled texture. These dabs are bigger than the stipples you painted in the previous example. The dabs should look spontaneous and not uniform to give this texture the most organic appearance.
To create a dry brush texture, do the following:
- First, load up your medium round brush with lots of pigment. Make sure the paint-to-water ratio is roughly 90% paint to 10% water. You want your brush to be mostly dry because the dryness of the bristles creates the dry brush texture.
- Second, use horizontal brushstrokes to drag the pigment across the paper. The texture will appear rough, coarse, and uneven due to the lack of water in the bristles. Keep dragging the brush across the paper to elongate the texture. If you need to, adjust the paint-to-water ratio to make sure that the brush retains the same consistency.
Voilà! You’re all done!
How do you feel now? If your hand feels loose and the painting process is going smoothly, then you’re settling comfortably into a warmup flow. Kudos to you!
Warmup #3: Quick Value Studies
The third exercise is the hardest of these watercolour warmups. In it, you learn how to balance the paint-to-water ratio to create watercolour value scales.
The goal is to paint quickly and effortlessly so that you don’t overthink the painting process. Let your intuition guide you and refrain from allowing your mind to interfere with any perfectionist tendencies that make you want to “fix” this warmup exercise.
To create the value scale, you’re going to paint a total of 5 circles that consist of 2 light values, 1 medium value, and 2 dark values.
- First, load up your medium round brush with any pigment of your choice. You’re painting light to dark, so make sure the paint-to-water ratio is 10% paint to 90% water. This way, the pigment will appear diluted and super light. Paint the lightest value in a circle on your watercolour paper.
- Second, add a bit more pigment to your brush so that the paint-to-water ratio is roughly 20% paint to 80% water. Paint this second value next to the first value.
- Third, add more pigment to your brush to darken the pigment. You’re now painting the medium value. So lay down the pigment to create the third value. It should be beside the second value, and you should see a smooth gradation forming.
- Fourth, add more pigment to your brush so that the paint-to-water ratio is roughly 60% pigment to 40% water. Paint the first dark value beside the medium value. If you need to, add more pigment or add another layer to this value so that it appears darker.
- Fifth, add more pigment to your brush and lay down the darkest value. It’s the fifth and last circle, so it needs to look darker than all the other values in your scale.
- You’ve completed one value scale. For additional practice, repeat steps 1 to 5 to create two more value scales like in the example below.
Bravo, you’re all done! Take a look at your value scales. The scales should gradually shift from super light to quite dark.
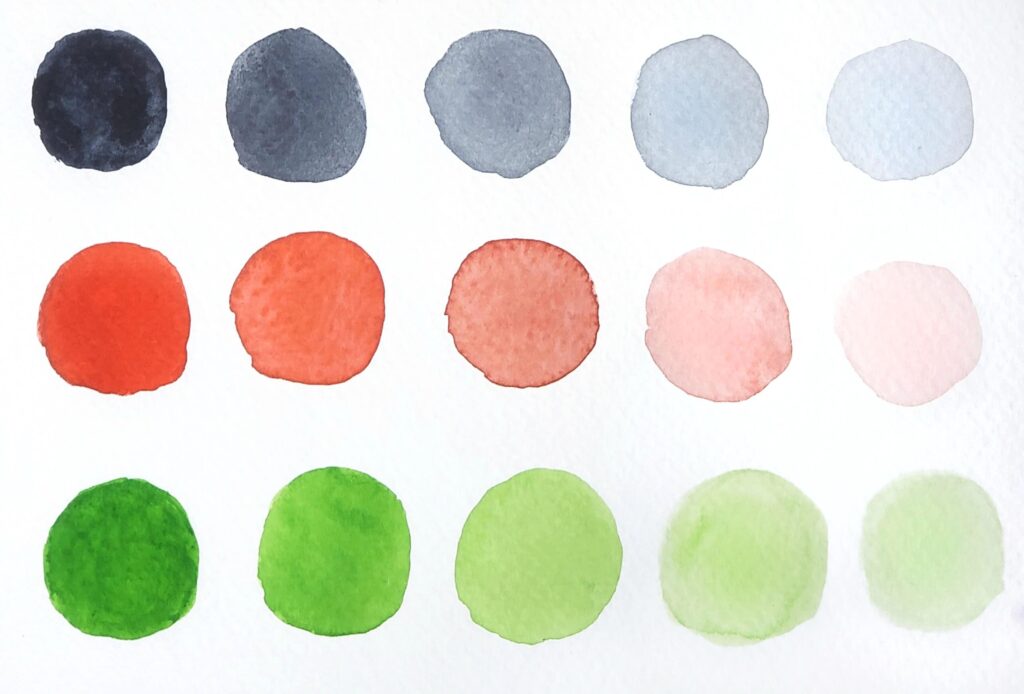
Don’t worry if the values don’t change in a perfect gradation. Remember that you’re doing a warmup, so painting quickly and loosely is the goal.
“Done over perfect” is your motto!
If you’re feeling good about your first value scale, I encourage you to repeat this warmup exercise… but with a twist!
Start with the darkest value and work your way to the lightest value. That way, you’re learning how to control the flow of water from light to dark and from dark to light.
Being able to skillfully manipulate the water this way helps you improve and refine your water control skills.
Conclusion
In this article, you’ve learned the easy step-by-step process for 3 of the best watercolour warmups.
By practicing these warmup exercises, you’re setting yourself up for success with your watercolour paintings.
So always remember to take the time to warm up whenever you sit down to paint.
And don’t worry about how long you warm up. Some people prefer a quick session of 15 minutes. Other people prefer to take up to an hour or more to warm up.
Do whatever suits you best.
Now that you’re all warmed up, check out this easy watercolour painting for beginners to complete an easy watercolour painting in only 10 minutes!
Did you enjoy these watercolour warmups? If so, which one did you like the most? Share your response in the comment section below!
Miranda Balogh
Artist & Online Educator

Dear Miranda,
Thank you for your warming-up tips.
These are very welcome for my, because of my rheumatic desease.
My fingers, pulse joint and schouders are , specialy in the beginning, quote very stiff.
So these excercises are very usefull to me.
I’m gone use these for shure!
Regards,
Frits Keulers
Thank you for your kind words! I’m glad that you found these watercolour warmups to be easy and gentle.
Hi Miranda. Experimenting with different brushes helps me a lot. I learn what I can and can’t do with my brushes. It saves lots of time when I finally get down to painting.
Hi Rhonda! That’s a great way to practice, and I don’t doubt that it’s a huge time saver. Thank you for sharing!