As a watercolour artist, one of the best skills to develop is the ability to mix paint effectively.
The best way to develop this skill is to create a watercolour mixing chart that reveals how the paints in your set work when they’re blended together in various combinations.
A watercolour mixing chart is a grid system that provides information about different colour mixes that your pigments can create. The paints are labelled along the X and Y axes, and the box that intersects both axes shows the colour that is created when both pigments are mixed together.
Fortunately, it’s rather easy to create you own DIY colour mixing chart.
So, let’s discover why making this chart is so important, and then you’ll learn how to create your own!
DISCLOSURE: This page contains affiliate links. If you make a qualified purchase using any of the links, I’ll earn a small commission at no extra cost to you. I appreciate every sale because it allows me to create free content to promote the growth of this website.
Table of Contents
What is A Watercolour Mixing Chart?
As discussed, a watercolour mixing chart maps out the different colour combinations that your paints can create.
This information is important because the chart reveals which pigments need to be blended together to achieve a desired colour.
So when you’re painting, you can consult your watercolour chart to decide which paints you will need for the colour scheme you want to use in your artwork.
Why Should You Make a Watercolour Mixing Chart?
There are many positive benefits that you will enjoy by making your own mixing chart.
You should make a watercolour mixing chart because it helps you understand your paints better because you learn how the pigments mix, react, and blend with one another. In this way, a colour mixing chart makes it easier to learn about colour theory and mixing.
But that’s not all!
Another advantage of creating a mixing chart is that the graph reveals which colour combinations produce lighter, darker, more vibrant, and duller mixes.
You’ll even have the opportunity to learn about which colour combinations mix poorly, thus resulting in muddy colours.
Related: Check out this article to learn about 9 ways to avoid muddy colours.
Moreover, having the colour chart labelled, filled in, and completed means that you have an excellent visual reference to use whenever you paint with watercolours.
Whether you’re warming up, practicing techniques, or working on a finished piece, you can reference your watercolour mixing chart to quickly find the specific colour mixture that you desire.
Watercolour Supplies You Will Need
Before you begin, make sure you have all these art supplies:
- Watercolour paints (I’m using White Nights Watercolour Paints)
- Watercolour brushes (I’m using Silver Black Velvet Brushes)
- Watercolour paper (I’m using Arches Cold-Pressed Paper)
- Mixing palette (I’m using Meeden Porcelain Mixing Palette)
- Masking tape (I’m using Pro Artist Tape)
- Heat tool/gun (I’m using Mlife Mini Heat Gun)
- 2 jars of water
- Black ink (I’m using Speedball Black Ink)
- White ink (I’m using Winsor & Newton White Ink)
- Graphite pencil (I’m using Staedtler Mars Lumograph Pencils)
- Eraser (I’m using a Faber-Castell Kneaded Eraser)
- Ruler
Now that you have all your supplies, let’s start the tutorial!
How Do You Make a Watercolour Mixing Chart?
For this demonstration, I’m using 100% cotton watercolour paper because it is very absorbent, thick, and sturdy. As well, pigments will dry more vibrantly on this type of paper.
Now that that’s settled, let’s get to the fun stuff!
In a nutshell, how do you make your watercolour mixing cheat sheet?
To make a watercolour mixing chart, divide your watercolour paper into as many boxes as there are paints in your set. Then, label each paint’s name across the X and Y axes. Next, mix the two corresponding pigments and fill in the first box. Repeat this process until all the boxes are filled in.
1. Draw the Mixing Chart Grid
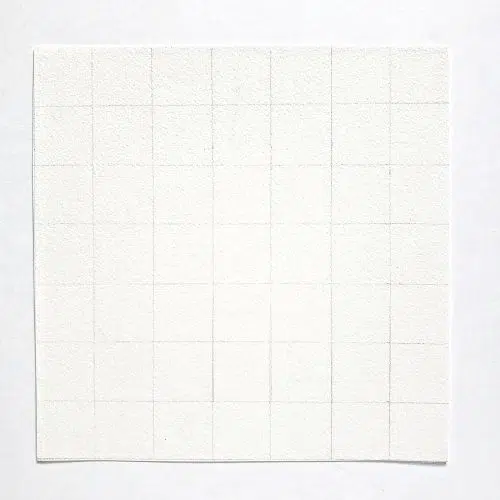
Using your ruler, measure your paper and make tiny marks on the page where each row and column will be drawn.
You want to make sure that there are as many boxes as there are paints in your set, plus an additional row on the X and Y axes. This extra row and column will be used to label the paints’ names.
Once you’ve measured the boxes evenly, use a ruler to trace the lines horizontally and vertically on the paper.
When you’re done, you should have a simple grid that is, at this point, empty.
2. Label the X and Y Axes
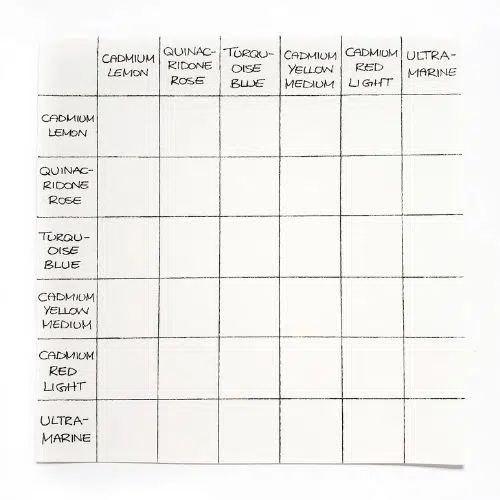
Now that you’ve drawn the grid, it’s time to label the X and Y axes.
For example, if your watercolour mixing chart has 12 paints, label the name of each paint down the X axis.
Then, label the name of each paint across the Y axis.
After all the paints have been labelled, you should use a waterproof pen to trace over all the words. As well, you should use the pen to trace over all the lines on your grid.
I strongly advise you to do this for 2 main reasons:
- You don’t want the graphite to smudge or fade, so inking over it will make the letters and lines permanent
- You need the letters and lines to be drawn with waterproof ink so that they aren’t ruined when you add the watercolour pigment to the chart
When you’re all done outlining the letters and lines, wait a while for the ink to dry.
Gently rub your finger over the ink to make sure that it has dried. At this point, it should be perfectly fine to use your eraser to get rid of the remaining graphite lines.
Once all these steps have been completed, move on to the next step.
3. Mix the Paints and Fill in the First Box
Now comes the fun part!
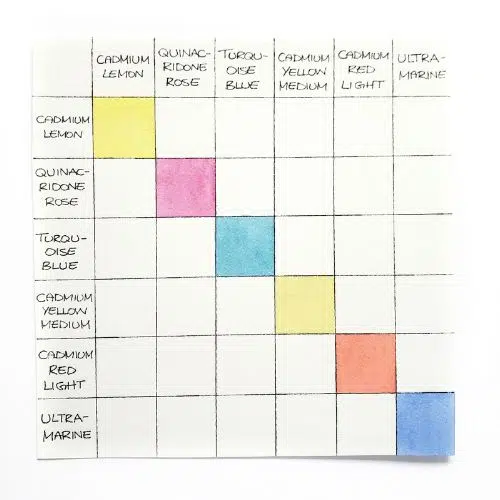
You’re going to start in the upper left-hand corner and work your way down and across the chart.
So, identify the first empty box on the watercolour mixing chart. Look at the paint names on the X and Y axes. You’re going to mix both of those paints in your paint palette.
To do this, wet your paintbrush and dab a bit of each pigment into the mixing palette. The watercolour mixing formula you’re aiming for is a 50/50 mix of both pigments.
In addition, you want the consistency to be balanced, meaning it’s neither too watery nor too thick.
Related: If you need help with water control, I highly encourage you to check out this article to learn about the paint to water ratio.
Once you’ve achieved the perfect balance, take your paintbrush and fill in the first empty box.
I advise you to use a flat brush to do this because you’ll be able to paint with more precision and accuracy than if you used a round brush.
And if you don’t want any of the pigments touching one another on the grid, you can leave a small white space around the border of the box to make the boxes look distinct.
But if seeing the colour mixes side by side doesn’t bother you, you can skip this step.
4. Fill in All the Empty Boxes on the Grid
Next, you’re going to move onto the next box on the chart. You can either work across the chart or down the chart. Pick whatever direction suits you best.
Essentially, from here on out you’re going to repeat the same process over and over until every single box is filled with a new paint mixture.
Remember that each paint mixture will appear twice on your watercolour mixing chart! To avoid wasting time and paint, don’t forget to paint both boxes at the same time.
Depending on how many paints you’re using, this may take some time.
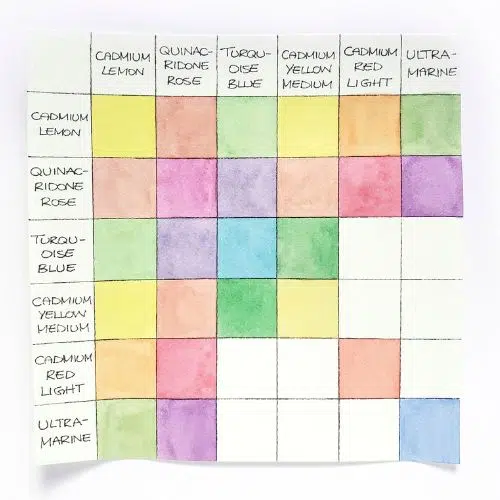
And when you’re all done, wait for the pigments to completely dry before you move on to the final step.
In this last step, take some white ink (or white gouache) to touch up any splatters of watercolour pigment or ink that may have gotten on your paper.
And just like that, you’re all done!
Conclusion
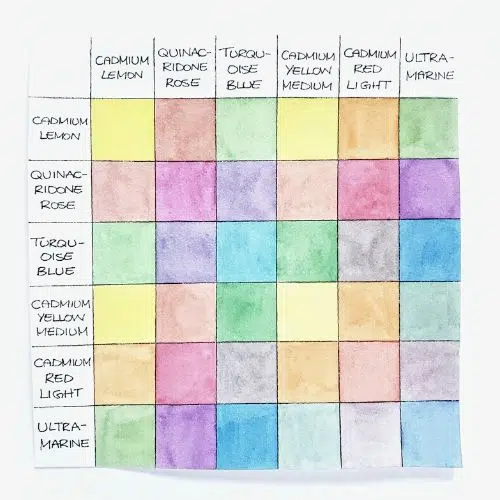
By following the step-by-step instructions outlined in this watercolour mixing chart tutorial, you were able to create your own mixing chart with ease!
To optimize this strategy, I suggest that you complete a new chart for every set of paints that you own.
This way, you’ll be able to build a library of reference charts that you can consult at anytime you want.
What’s more, every time you create a new colour mixing chart for watercolour, you’re learning more about how each paint behaves with the other paints in the set.
This allows you to see how paints from different brands compare and contrast to one another.
So, have fun creating your charts and use them as often as you can!

Miranda Balogh
Artist & Online Educator





This is a great idea I will get started on it today
I’m glad you like this idea. Once you make your watercolour mixing chart, you’re going to use it all the time because it’s so helpful!
I’m new to watercolor painting. Im so glad that I found your lessons! They are so informative! Thank you so much!
Welcome to the wonderful world of watercolour! I’m glad you enjoy my content.