In order to become skilled at watercolour painting, you must understand how to layer watercolours properly.
Watercolour is a transparent medium, after all.
That means you should learn the best methods for layering watercolours so that your pigments appear transparent, vibrant, and luminous.
To achieve great results, the best watercolour layering tips include letting the layers dry completely before painting over them, applying thin layers, painting from light to dark, and layering different pigments as a way to mix colours.
In this article, you’ll expand your layering knowledge by learning about:
- The importance of transparency in watercolour painting
- 5 watercolour layering tips that’ll simplify your painting process
- Mistakes to avoid and what to do instead for optimal layering
By the time you’re done reading, you’ll understand the best methods to apply watercolour so that every layer you paints looks transparent and bright.
Table of Contents
1. Understand That Watercolour Is a Transparent Medium
First of all, it’s important to understand that watercolour is a transparent art form.
The beauty of watercolours is best illustrated when the layers are transparent because that way, the vibrancy and brightness of the pigments really shine through.
In my opinion, the 3 most important qualities of a good watercolour painting are transparency, vibrancy, and luminosity.
Therefore, in order to achieve the best results, it’s ideal to paint with watercolour pigments that are transparent.
To do this, opt for watercolour paints that are made of single pigments because that means they’re only made of one single pigment as opposed to 2 or more pigments.
Single pigments are better because they perform more consistently and they mix more cleanly with other colours due to their simple composition.
On the other hand, if you paint with watercolours that have multiple pigments or they contain lots of fillers, those pigments often appear chalky and opaque. They mix less cleanly, often resulting in dull and muddy colours.
2. Let Every Layer Dry Completely
One of the most common watercolour mistakes beginners make is not waiting for the layer to dry before painting over it.
If you’re impatient and you don’t wait for the paint to dry, your next layer will blend with the previous layer because the wet pigments will naturally mix together.
As a result, you’ll accidentally create muddy watercolours that look dull and lifeless.
The solution to this problem is simply to wait. In other words, patience is key!
But if you’re a busy person, you might be wondering, “How long should I wait between layers?”
There isn’t a one-size-fits-all answer because drying time depends on the quality of your paper, how large the wash is, and how much water you used. So it can take anywhere from a few minutes to more than 10 minutes for the layer to dry.
That being said, the hard truth is that there are only 2 ways to approach this:
- Wait for the layer to dry, no matter how long it takes.
- Use a heat gun to dry the layer and speed up the painting process.
As you can see, watercolour is a beautiful medium that teaches us to slow down; to be intentional with every brushstroke and layer.
So if you’re able to shift your mentality in this way, you might discover that watercolour painting is a gentle hobby that teaches you how to live a slower and softer life.
3. Paint Light to Dark
One of the best watercolour techniques that you should use on a regular basis is painting from light to dark because it’s the ideal order for layering watercolours.
That doesn’t mean you have to paint light to dark in every circumstance. There are obviously exceptions to this rule.
That being said, the general rule of thumb is to start with lighter values and gradually build them up to darker values because it’s easier to layer dark pigments over light pigments.
If you’d like to learn more about values in watercolour painting and understand why they’re important, check out this article about how to paint watercolour value scales.
On the contrary, it’s not easy to paint dark to light because the dark pigment is too strong, so it often overpowers the light pigment.
That means your layers will either appear too dark or too opaque if you paint with dark values first.
Therefore, if you’re in doubt, always start with lighter values because you can always layer over them to darken the value. But keep in mind that painting in reverse is much harder to fix.
Check out the step-by-step watercolour layering tutorial below to see how I layered light warm colours first, and then followed up by layering dark brown pigments on top to create a watercolour landscape painting.
4. Apply Thin Layers
Applying thin layers is one of the best watercolour layering tips that every watercolourist should know.
“Why thin layers?” you might be wondering.
Well, thin layers look light and transparent. When you layer them on one another, their vibrancy shines through the layers more easily.
In addition, applying thin layers allows you to build up the vibrancy with greater precision and control, especially if you’re adding details and shadows to your subject matter.
On the other hand, if you apply thick layers, they often appear too opaque. That means you lose watercolour’s number one quality, which is transparency.
As well, it’s harder for the colours to appear colourful because they lose their vibrancy under all that thick, heavy paint.
Lastly, applying thin watercolour layers allows you to use the white of the paper in creative ways, such as when you’re painting snowy landscapes, misty scenes, and fluffy white clouds like in the painting below.
5. Layer Pigments on the Paper to Create New Colours
Did you know that you can mix watercolours directly on the paper?
It’s true! You don’t have to premix colours in a mixing well or on your palette.
Layering pigments to create new colours on the paper is an excellent way to add shading, create textures, or add dimension in your painting.
So let me show you how to do this.
In the following example, I’m demonstrating how to layer watercolours on the paper to create green. I painted an X so you can easily see where the layers crossover to create the green hue.
- Choose a yellow pigment of your choice and dilute it.
- Load up your brush with a paint-to-water ratio of roughly 40% paint to 60% water.
- Use a flat brush to paint a rectangle on your watercolour paper by using the wet-on-dry watercolour technique. Tilt the rectangle on a diagonal to paint one side of the X. As well, make sure the layer is thin so that it retains its transparent and luminous qualities.
- Wait for the first layer to dry completely.
- Rinse off your brush and then dilute a blue pigment of your choice. Load up your brush with a paint-to-water ratio of 40% paint to 60% water. Make sure it has the same consistency as the first layer your painted.
- Use your brush to paint a diagonal rectangle over the first rectangle by using the wet-on-dry technique. Cross it over the first layer so that you create an X.
- Wait for the second layer to dry.
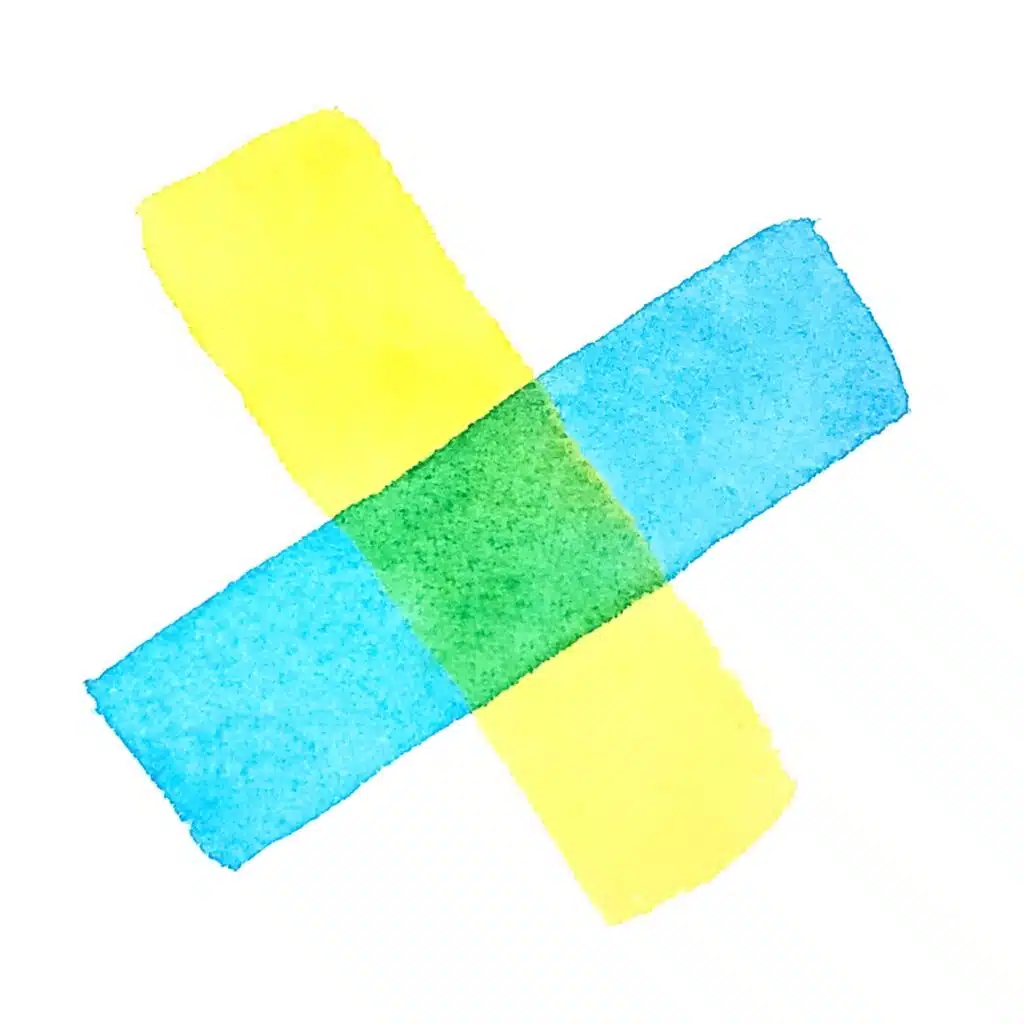
And voilà! As you can see, when you layer the blue over the yellow pigment, both pigments mix together to create a beautiful green hue.
So take some time to experiment with different colour mixes to understand how you can mix colours directly on the paper.
In addition, you can use the colour combinations and ideas I’ve listed below to help you brainstorm your next painting project.
- Layer blue over yellow to create green (Use it to paint trees, leaves, and grass)
- Layer red over yellow to create orange (Use it to paint sunset skies and flowers)
- Layer purple over yellow to create brown (Use it to paint trees and mountains)
Conclusion
In this article, you learned about the 5 best watercolour layering tips for beginners that’ll improve your watercolour artwork and make your painting process smoother and easier.
Layering is an essential skill in watercolour painting, so make sure you spend the time learning how to master this skill.
Not only will it improve the quality of your paintings, but understanding and applying these layering strategies will make the painting process a lot more enjoyable for you.
Now I want to hear from you!
Which of the 5 layering tips is your favourite? Share your opinion in the comment section below!

Miranda Balogh
Artist & Online Educator

Leave a Reply