Muddy colours are paint pigments that look dull, flat, and opaque.
For this reason, they make watercolour paintings appear lifeless because the pigments lack vibrancy and transparency.
So can you learn how to avoid muddy colours? Of course!
That’s why, in this article, I’m sharing 9 useful strategies to help you:
- Adopt painting strategies that will minimize the likeliness of creating muddy colours
- Learn about the importance of colour theory and colour mixing so that you understand how to produce clear, vibrant colour mixes
- Understand paint properties and how these characteristics influence the vibrancy or muddiness of your colours
By the time you’re done reading, you’ll have a bunch of new ideas to help you paint more vibrant and transparent watercolour paintings!
Table of Contents
What Are Muddy Colours?
First of all, what are muddy colours?
Muddy colours are paint pigments that appear dull, opaque, and flat because they have lost their vibrancy. Therefore, watercolourists avoid mixing these colours because they are lifeless.
Unfortunately, without basic understanding of colour theory, paint properties, and colour mixing, many new watercolour painters struggle with accidentally producing muddy colour paintings.
And please note that muddy colours are not browns, greys, and neutrals that are intentionally mixed to neutralize or mute the pigment.
Why Does My Watercolour Look Muddy?
There are many reasons why your watercolours look muddy. Some common reasons are:
- You’re not letting each layer dry before painting the next layer
- You’re applying too many unnecessary brushstrokes
- You don’t understand basic colour theory
- You’re mixing paints with properties that don’t combine well
- You’ve combined too many different pigments into 1 mixture
- You’re not sure if your pigments are transparent or opaque
- You’ve never made a watercolour chart to test paint combinations, so you aren’t aware of which colour mixes create muddy colours
- You don’t change your water cups often enough
- You never clean your palette, so the leftover pigment contaminates new paint that you add to the palette
Realistically speaking, you’re probably making some of these common watercolour mistakes.
So it’s time to discover how to avoid muddy colours so that you can finally paint vibrant watercolour artwork!
How to Avoid Muddy Colours in Watercolour
Avoiding muddy colours requires knowledge of basic colour theory, pigment properties, and understanding how your watercolour paints behave when mixed together.
In addition, making a few simple changes to your current painting process will minimize the chances that you might accidentally contaminate your paints.
Related: Improve your watercolour paintings by learning about the 3 artistic traits of good watercolour artwork.
1. Let Each Layer Dry Completely
Let me guess…
At some point, you’ve been impatient and decided to paint on a layer that wasn’t 100% dried yet. So the layers blended and produced ugly muddy tones.
It’s a mistake that all watercolourists make, myself included. And for this reason, it’s a mistake we need to be mindful to not repeat.
Thus, the best advice is to simply wait until the layer is dried before you go over it with another glaze.
This is especially important if you’re painting with watercolour and ink because the ink will bleed into the wet pigments if the ink hasn’t dried.
This way, you can preserve the vibrancy and integrity of each layer.
If you’re pressed for time or you’re just impatient, use a hair dryer or a hand fan to speed up the drying process.
2. Don’t Apply Too Many Brushstrokes
By applying too many brushstrokes, you are likely to dilute the pigments on your brush. This will make the paint appear rather dull and washed-out when it’s applied to the paper.
What’s worse, if you keep applying more brushstrokes, you’ll disturb the layer that you’ve already painted since watercolour pigments are reactivated when water is added to them.
So the best thing to do is to learn how to control the water to paint ratio so that you understand how much water to use.
This way, you’ll learn how to paint with intentionality so that every brushstroke serves a purpose in your watercolour painting.
So if you want to learn how to fix a muddy painting, start by applying fewer brushstrokes.
3. Learn Basic Colour Theory
A common question I hear is: How do you keep watercolours from getting muddy colours?
One of the most common reasons why watercolourists end up with muddy colours is because they don’t take the time to learn about colour theory.
Colour theory is a set of rules, guidelines, and principles that help artists decide how to use colour effectively and strategically in their artwork.
So, the best advice I can give you is to:
- Learn about primary, secondary, and complementary colours for basic understanding of colour theory
- Understand that mixing watercolour complementary colours (opposites on the colour wheel) can be used to darken colours
- However, mixing the wrong complementary colours together may result in dull washes if their pigment properties clash
- Be aware that all colours have a cool or warm colour bias. This colour bias influences a painting/mixture’s colour temperature
If in doubt, take out a scrap piece of paper and spend a few minutes making colour swatches.
By doing this, you will be able to test your paint mixtures before you start painting.
Use this knowledge to experiment with different combinations until you produce colour mixtures that are vibrant, clear, and fresh.
Note that these colour theory concepts are important to learn, so take time to learn about them. However, covering each one individually is beyond the scope of this article.

4. The Pigment Properties Don’t Mix Well
What does this mean?
Basically, all paint pigments are made of properties that make up their composition.
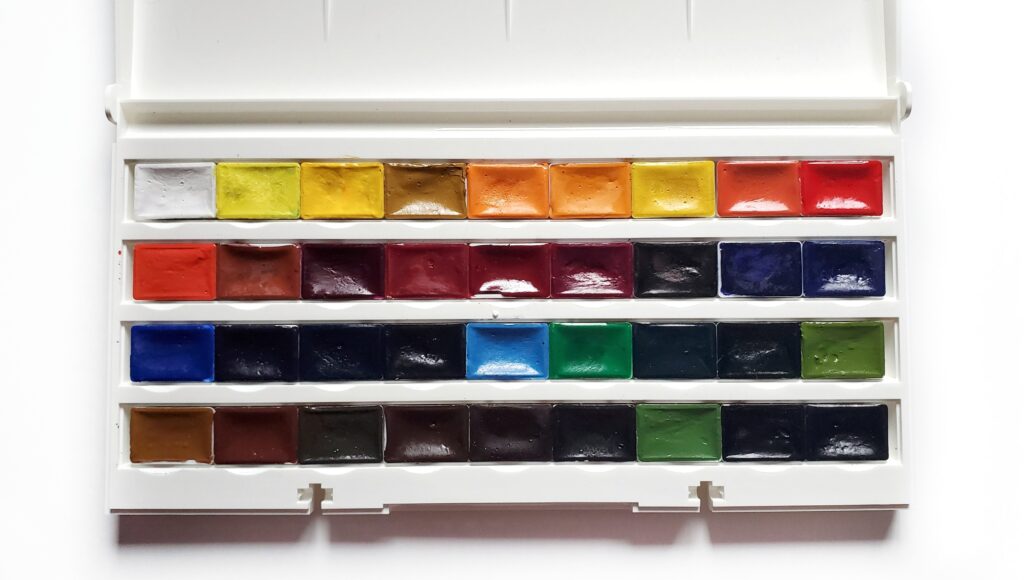
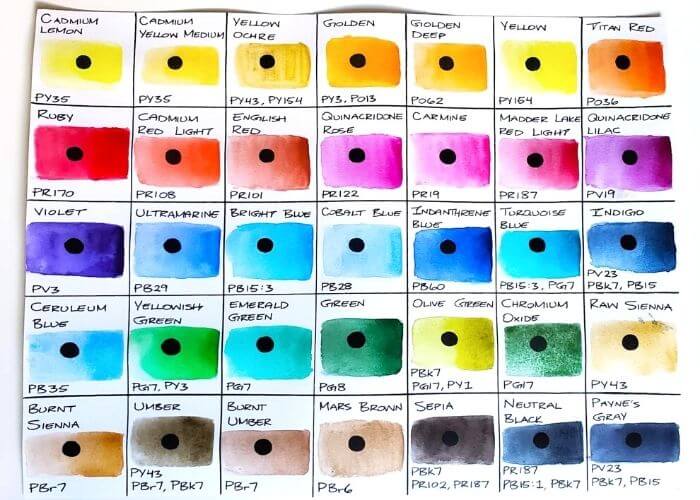
For example, here’s a short list of pigments from the White Nights artist grade watercolours to illustrate this example:
- Cadmium Lemon: PY35
- Quinacridone Rose: PR122
- Ultramarine: PB29
- Olive Green: PBk7, PG17, PY1
- Sepia: PBk7, PR102, PR187
As you can observe, the “P” stands for pigment, and the following letters and numbers tell you about the properties that make up each individual pigment.
“Y’ stands for yellow. “R” for red. “B” for blue. “G” for green. And “Bk” for black.
Note: I’m not going to explain the nitty-gritty of the numbers since that is beyond the scope of this article. So just focus on the letters for now to keep things simple.
Pigment information is important to learn because it helps you understand how to make better colour mixing choices.
For example, Olive Green and Sepia are not pure pigments because they are both created by combining pigments from 3 colour groups.
On the other hand, Cadmium Lemon, Quinacridone Rose, and Ultramarine are purer pigments because they are made of 1 pigment.
So, when you’re mixing colours, keep these tips in mind:
- Purer pigments tend to mix well by creating more vibrant, clear mixtures
- Non-pure pigments tend to create muddy colours because too many pigments are competing against one another in a mixture
- Be careful when mixing complementary colours because the opposing pigments (such as mixing blue and orange) could create an ugly, washed-out colour
As you get to know your watercolour palette better, you’ll memorize a lot of this information by heart.
5. You’ve Mixed Too Many Colours Together
Piggy-backing off of the example mentioned above, let’s say you wanted to mix Olive Green with Sepia for whatever reason.
You’d be coming 2 colours which are composed of 3 pigments each.
Therefore, when you create your new paint mixture, that new colour will be created by combining 6 different pigments into one!
Now, let’s say you wanted to darken the mixture by adding some Neutral Black, which is also made of 3 different pigments (PR187, PB15:1, and PBk7).
Now you have one new paint mixture that is made from 3 different paints. This combination has been created by mixing 9 different paint properties together!
As you can see, things can get convoluted quite quickly. As such, your paint mixture is likely to appear dull, dirty, and too opaque.
Therefore, the best piece of advice is to limit your paint mixtures to 2 – 3 colours with purer pigments. This will ensure that the new colour mixture appears more transparent and vibrant.
Note: Check out this article for more clever watercolour hacks that can make your painting process smoother, easier, and faster.
6. Know if Your Paints Are Transparent or Opaque
No matter what paints you’re using, it’s important to understand whether your paints are transparent or opaque.
Unfortunately, this point is often ignored when beginners learn to paint with watercolours.
But why does this matter?
Because transparent paints mix more cleanly. They maintain their luminosity, which is essential for painting transparent layers.
On the other hand, opaque paints are more prone to producing muddy colours when they are mixed with other colours.
So keep this information in mind whenever you’re mixing pigments because it might be more practical to mix transparent colours together and apply opaque watercolours individually.
But ultimately the choice is up to you. Just understand the advantages and disadvantages of transparent vs. opaque paints.
7. You Need to Make Watercolour Charts
A watercolour chart is simply a chart in which you label all of your watercolour paints and then use it as reference.
When you buy a premade palette or create your own unique palette, you should create a colour chart so that you can reference it while you’re painting.
The 2 charts I recommend you make are:
- A watercolour swatch chart with pigment information so that you know about each paint’s unique properties
- A colour mixing chart in which you can see how all the paints mix with one another
By creating these 2 colour charts, you’ll be able to easily access all the necessary information to inform your painting decisions.
Yes, it will take a bit of time to complete both of these tasks.
But the benefits will pay dividends in the future because you will have a much better understanding about your watercolour paints.
8. You Must Change Your Water Jars More Often
This one is surprisingly easy to overlook for some reason or another.
When you’re painting, you should be using 2 different jars of water to clean your brushes. You can do either of the following:
- Have 1 jar for clean water and the other for rinsing a dirty brush
- Have 1 jar for rinsing dark colours and another for rinsing light colours
It doesn’t really matter how you set up your workspace. The key takeaway is to make sure that you are regularly changing the water.
If you don’t, every time you dip your brush into the “clean” water, your brush will pick up paint particles that are swimming in the jar.
When these tiny particles get into the bristles of your brush, they can easily darken or muddy the next layers of paint that you lay down.
And as a result, your paint will be contaminated, which means you’ll lose the vibrancy and translucency of your pigments.
So do yourself a favour and change the dirty water every so often.
Since this is an important way to minimize the chances of creating muddy colours, make sure you bring enough clean water when you’re doing plein air painting outside.
It’s not worth ruining a painting or wasting good watercolour paper just because you were too lazy to change the water.
9. Clean Your Watercolour Palette
Obviously, I don’t recommend cleaning your watercolour palette every single time you are finished painting because you don’t want to waste perfectly good pigment.
However, if you never clean your palette, but you’re adding fresh pigment to create new mixtures, you’ll likely contaminate your paint.
Contamination occurs when you’re mixing paints with different properties together, which compromises the purity of the pigment.
This can compromise the intensity of your paint because the contamination neutralizes the vibrancy.
And as a result, you’ll produce a muddy colour.
So clean your palette on a regular basis because a clean palette ensures that the pigments you’re mixing are free of contamination.
Related: Explore this useful article to discover which watercolour paints are toxic and non-toxic.
Conclusion
As you can see, there are so many ways to accidentally create muddy watercolours.
But now that you’re armed with this knowledge, you have the ability to improve your painting process by adopting several of these useful watercolour tips.
You’ll soon realize that it’s easier than you think to avoid muddy colours and consistently paint bright, vibrant watercolour paintings.
But ultimately, the greatest takeaways are to create watercolour charts and to give yourself a crash course in colour theory if you haven’t done so already.
Believe me, you’ll thank yourself in the future for the skills you’ll develop.
Do you struggle with mixing muddy colours? How are you learning to avoid this common watercolour mistake? Share your thoughts in the comments below!





It’s hard to make watercolors look clean. Thanks for the tips. Very needed!
Thank you! I’m glad you found these watercolour tips helpful.
These are great tips! I love painting with watercolor so I will definitely have to remember these!
Awesome, I’m glad you enjoyed these watercolour tips!
So very informative. I love your advice and would love for you to dive more into color theory in another article. Sounds so interesting. We will definitely play around with mixing colors too.
Thanks for the positive feedback! I’m planning on tackling colour theory in the future, so stay tuned for that.
Watercolour is such a beautiful art. Thanks for sharing these tips! I’m glad I’ll have this for reference next time I pick up a brush
I’m glad you enjoyed this article!
Super helpful, literally me every time I use watercolours, I end up with a muddy color when mixing it – and then try to save it by adding more color, which apparently – BAD IDEA!
I also used to think that adding more colour would fix the muddy colour issue. But it’s from our failures that we learn the best, right? Thanks for sharing!
Lots of great information here! I’d never heard of creating a watercolor chart. Also, I didn’t know about transparent and opaque paints.
Thank you! Understanding which of your watercolour paints are transparent and which ones are opaque is such a game-changer when it comes to improving your watercolour skills.
Miranda
Thank you for this article!! I’ve made color charts in the past but I’ve never included
the color numbers on the charts and now I realize my error. I’m going to remake my
charts and this time include the color number descriptions. What a foolish mistake
on my part. Thank you for such a great way of explaining it.
I’m glad that you learned something valuable from this article. Thank you for sharing your experience with us!