We live in a visual and digital world.
For this reason, photography has become an increasingly important skill to learn because it captures beautiful imagery.
And, as an artist, you should learn how to take lovely photographs of your artwork so that you can display them, make money, or build a portfolio.
That’s why, in today’s article, I’m giving you a simple crash course in the art of the flat lay for artists so that you can:
- Learn how to take aesthetically appealing photos from the comfort of your smartphone
- Develop the necessary skills to create balanced flat lay compositions
- Master editing techniques that will improve the quality of your artwork photography
By the time you’re done reading, you’ll have the confidence to start producing even better pictures of your artwork!
DISCLOSURE: It should be noted that I am not a professional photographer. The flat lay photography tips that I’m sharing in this article are based on the strategies I’ve used to create flat lay photos for my social media accounts and for my website.
Table of Contents
What is Flat Lay Photography?
So, before we begin, it’s important to understand how flat lays differ from traditional landscape or portrait photography.
Essentially, flat lay photography is an image that is taken from a bird’s eye perspective. Objects are strategically placed on a flat surface, and a camera is used to take a photo from above.
Photographers use flat lay photography for several reasons, including:
- To take crisp and clear product photos
- To use props as a means of visual storytelling
- To create consistent brand imagery
As an artist, I’m guessing that you’ve seen lots of artists share their flat lay photos in popular art communities and on online platforms such as Instagram.
As well, you will also see lovely flat lays of artwork on Pinterest, Facebook, Google, and on websites that are selling prints.
What Does Flat Lay Mean in Art?
The flat lay for artists means that you are taking a picture of your artwork from a top-down angle. The goal is to display your artwork in a visually appealing manner.
Flat lays are used in art for many reasons. For example, an artist may choose to display their artwork in a flat lay photo in order to:
- Create a more visually appealing image as opposed to sharing a standard image of their artwork
- Display their artwork and art supplies in a creative fashion
- Develop a consistent brand with a unique flat lay style
- Design a beautiful Instagram feed or portfolio
- Produce stunning product advertising so they can promote or sell their prints, designs, services, etc.
As you can see, flat lay photography can play many important roles in an artist’s life and career.
And since we live in an increasingly visual and digital world, you can share flat lay photography across multiple social media platforms for artists in order to promote your artwork and develop your brand.
Why Do Photographers Use Flat Lay Photography?
Photographers use flat lay photography for storytelling and messaging purposes.
For example, a flat lay photo of maps, passports, and photos of nature can tell the story of a traveller who is exploring the natural world.
In addition, a flat lay image of a vanity desk full of makeup and jewellery can convey the message of a woman who is exploring her femininity.
Just like photographers, artists can take flat lay photography at home by using props to enhance the story or messaging in their artwork.
So, if you’re interested in learning how to take flat lays for Instagram, Pinterest, Etsy, and so on, then keep reading.
How Do You Take Flat Lay Pictures?
So, are you ready to learn how to master flat lay photography?
All you have to do is follow the 5 steps that are outlined in this section. Once you understand these basic skills, you’ll be more than prepared to level up your photography skills.
It just takes time, practice, and a whole lot of experimentation.
Now, let’s dive in!
1. Create a Prop Box
So, you might be wondering, “What should be included in a flat lay?”
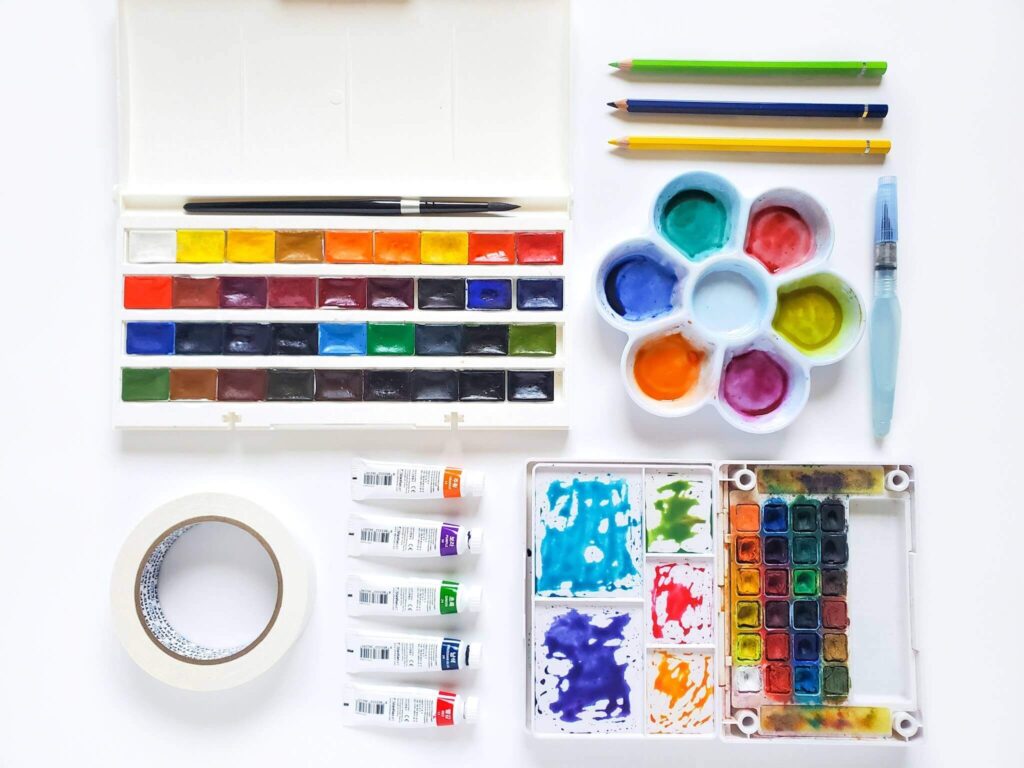
First, you need to brainstorm all of the props that you want to use in your photography. Essentially, you’re creating a prop box.
For example, the flat lay for artists will probably use a variety of drawing and painting art supplies in your compositions, including:
- Watercolour, gouache, acrylic, or oil paint
- Paintbrushes
- Coloured pencils
- Markers
- Graphite pencils
- Erasers
- Sketchbooks
- Pen and ink tools
- Mixing palettes or trays
Once you’ve brainstormed all of your art-related products, you should also brainstorm some non-artsy items to add to your flat lay. Props may include:
- Small plants such as succulents
- A cup of tea or coffee
- Clothing pins and paper clips
- Ribbon and string
- Flowers and leaves
- Rings and bracelets
- A deck of cards
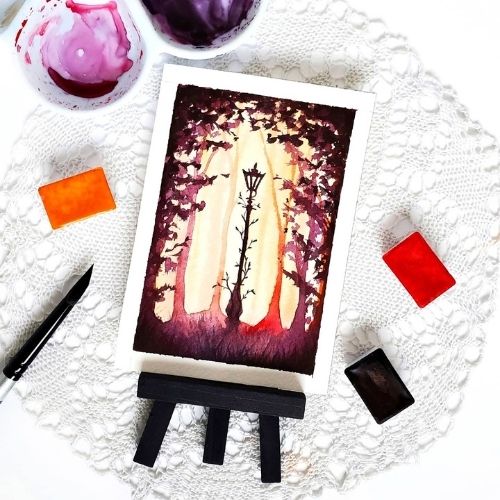
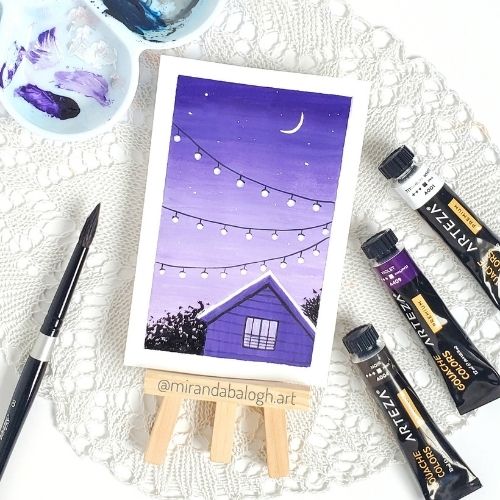
Play around with textures to add more visual interest to your flat lays. You can use a variety of textures including: wood, marble, glass, fur, stone, and cloth.
Refer to the flat lay artwork below to see how I incorporated a doily to add texture to the photograph.

2. Decide on the Colour Scheme
Before you start playing around with your photo’s composition, you need to decide on the overall colour scheme.
Will your flat lay be based on warm colours? Or Cool colours? Black and white, or pastels?
Also, keep in mind the colours used in your artwork. For example, if you’ve created a monochromatic artwork, then perhaps you should consider using props with similar tonal values.
Take it a step further and consider colour psychology.
For instance, if your artwork uses a lot of yellow, then you would be invoking feelings of joy and happiness.
Is that how you want the viewer to feel when they view your artwork? If so, then incorporate colours with similar psychology, like orange, to evoke feelings of positivity and optimism.
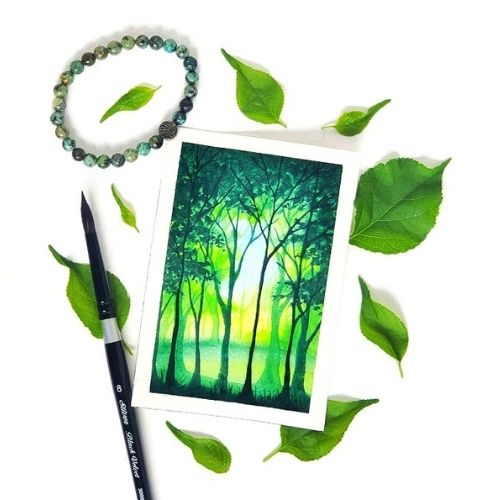
In the example below, I went with a green monochromatic colour scheme. Green leaves were chosen to compliment the nature theme, and they were placed around the artwork in order to give it a border.
3. Decide Which Prop Will be the Hero
What is a hero prop?
A hero prop or product is an image in which a single prop is the central focus of the photo.
For example, in flat lay photography for artists, the hero prop is most often the artist’s artwork because you want to draw attention to your piece.
In a flat lay, the hero prop is usually the largest item in the photo.
It’s best practice to first lay this item down on the flat surface, and then build the composition around the hero object.
Then, it becomes easier to figure out a composition that compliments the larger item. If you do this in reverse, you’ll have more trouble finding a composition that flows well.
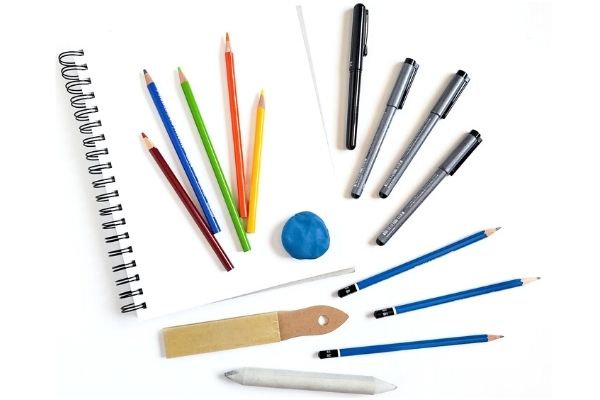
For example, in the image below, the hero prop is the sketchbook. It’s placed to the left in order to compliment the Rule of Thirds, and the remaining props are placed on or around it.
4. Consider the Light Source
When taking photos, it’s always recommended to use natural light over artificial light whenever possible.
If you can, take your photos in front of a large window. Natural lighting is the best because you don’t have to worry about your image looking too orange or too blue, which is often a problem caused by artificial warm and cool lights.
But if that’s not possible, you can use a ring light or some other lighting apparatus to brighten the flat lay. Just make sure you’re using white light as opposed to any other kind of light.
That being said, you want to make sure that you don’t overexpose your photo. In other words, don’t make the photo so bright that it looks overblown. It takes practice to achieve this balance.
Lastly, DO NOT USE FLASH! It will distort the light balance of your photo, so keep this setting turned off during the shooting process.
Note: A cheap and cost-effective way to improve your lighting is to buy white foam boards or cardboard paper. Use one for the surface of the flat lay, and 2 or 3 others to create a semi-box around your flat lay.
5. Create a Balanced Composition
Composition is key when creating a flat lay for artists.
The viewer’s eye should naturally move across the photo in a logical flow. When props are placed haphazardly, it will become difficult for the viewer to understand your image.
So, here’s a short list of flat lay tips and tricks that you can use to arrange your props in a balanced manner:
- Only choose 1 hero prop that will be the main focus of the image
- Only pick 1 large prop. Using too many larger props means that each one will compete for attention
- Vary the sizes of the props you’re using. Include 1 large prop, a few medium props, and fill in the leftover spaces with smaller props
- Watch out for spacing. You want to strike the perfect balance so that the flat lay looks neither cramped nor too sparse
- Experiment with different layouts. You can use the Rule of Thirds, large C curves, straight edges, and odd numbers to make your compositions look more dynamic
Creating balanced composition takes time and practice. So, experiment with your flat lay photos and don’t be afraid to play around with the composition until it feels right.
For example, in the image below I’ve placed the hero prop (my artwork) in the center. Then, I used an odd number of props to frame it because odd numbers are visually pleasing to the eye. Lastly, the paintbrush and tubes are pointing inwards to guide your eyes to the hero prop.
How to Edit Flat Lay Photos
Once you have taken a few shots of your flat lay photo, it’s time to learn how to edit flat lay photos.
Personally, I use a pre-set that I made in the Lightroom app, and then I make some final edits in an app called Snapseed.
VSCO is another popular photo-editing app, so check them out and decide which one(s) suit your style and preferences the most.
After you’ve chosen which app to use, it’s time to focus on editing your flat lay in a visually appealing manner.
So, here are my best photo-editing tips for flat lay artwork:
- Play around with the brightness and ambiance in order to lighten the overall quality of your photo. But be careful not to overexpose the photo
- Experiment with the shadows/blacks in order to boost the contrast
- If you want to make the shadows look less harsh, you can use the brush tool to lighten specific areas of the photo. Just click on exposure, choose the lighter option, and drag your finger over the shadows to lighten them
- To make the colours of your artwork and props stand out, you can boost the saturation. However, be careful so that your photo doesn’t look too modified and unrealistic
- Use a healing tool to erase any imperfections in the photo
- Select the crop tool in order to resize the image. It’s always a good idea to take a slightly bigger picture and then to crop it down as opposed to taking a photo that might end up being too small
- If you’re sharing your artwork on a public social media platform such as Instagram, you might want to use the text tool to brand your artwork with your name in order to prevent thievery
After a while, you’ll develop a personal editing style. If you’re using Lightroom, you can save your edits as a pre-set so that you can use the same settings in future pictures.
By doing this, you’ll save a lot of time in the future because all you have to do it slap a pre-set on your photo and voila! Half the work is already done.
In addition, using pre-sets will make your artwork, product, and brand photography look a lot more cohesive and stylistic.
But if you’re not too thrilled by your edits, you can purchase affordable pre-sets to make your life easier.

Conclusion
There you have it!
In this article, you have learned about the art of the flat lay for artists.
If you still have doubts about your photography capabilities, I encourage you to try out these photography tips the next time you take photos of your artwork.
You’ll quickly realize that developing basic photography skills isn’t as difficult as you may think.
Don’t believe me? Well…
…just take a look at the pictures I’ve included in this article. I’m not a pro photographer by any means, but I’ve developed a unique flat lay style with the basic photography skills that I have.
My audience has enjoyed the style of my flat lays, which I why I decided to to pass this knowledge on to you.
If you’d like, you can reference my stylized flat lay artwork on my Instagram account to get an idea of what your flat lay photography can look like once you start developing your own flat lay and editing styles.
Now be brave and start taking gorgeous photos of your artwork!
What’s your biggest struggle when it comes to flat lay photography? Share your thoughts in the comments below!
Miranda Balogh
Artist & Online Educator

These are some great tips! I have definitely struggled with flat lays in the past. Thank you!
You’re welcome! I’m glad you found these photography tips useful.
Such an easy to follow guide on taking flat lay photos. Your descriptions are great for the every day person and the artist. Love it.
Thanks! You’re right; even non-artists can use these flat lay tips to create nice photos.
Great tips. Getting the lighting right is usually my biggest challenge.
Mine, too! Finding the sweet spot between not too dark and not too overexposed is key. With some practice, you’ll be able to nail the lighting!
I’m so glad I found this because flat lay photography is perfect for bloggers to showcase their products and they make great stock photos. I didn’t think that they would be so easy to create! Thanks for the tips.
Yes, bloggers and entrepreneurs will also benefit from these tips. So good luck to you and your future flat lay photos!
These are great tips! I have started learning how to take my own pictures of the recipes I make and these tips will definitely help me with that! Thanks for sharing!
Awesome! These flat lay tips can work for all types of niches including food, clothing, makeup, etc. So I’m glad you’re able to apply this information to your food photography as well.
So much great information here, your post has definitely helped me think about a few things to change and practice when taking photo’s. Great blog girl! Thank you x
You’re welcome! Making a few little adjustments to your photography strategy can produce amazing results, so good luck with your future photos.