The ability to draw and sketch is the foundation of all artistic expertise.
Without developing this basic skill, it will be harder for you to progress in your art journey regardless of what medium you work with.
But don’t worry, for I’ve got a simple solution for you!
In this article, I’m sharing 4 tutorials based on easy sketching for beginners. By following these step-by-step tutorials, you’ll be able to:
- Sketch different types of subject matter that are easy and suitable for beginners.
- Implement strategies to help you develop your sketching skills more quickly.
- Develop foundational skills such as form and shape, light and shadow, basic shading, etc.
By the time you’re done reading, you’ll know how to enjoy a fun sketching practice while focusing on the specific skills that you’d like to improve.
DISCLOSURE: This page contains affiliate links. If you make a qualified purchase using any of the links, I’ll earn a small commission at no extra cost to you. I appreciate every sale because it allows me to create free content to promote the growth of this website.
Table of Contents
Easy Sketching for Beginners: Required Art Supplies
You’re probably wondering: What is the easiest thing to draw for beginners?
Well, in my opinion, one of the best drawing exercises for beginners is to practice drawing subjects in their simplified forms.
Right now, at your level, you don’t need to worry about complex composition or fine detail.
So, in this section, I’ve chosen 4 different drawing prompts and I have organized them into simplified tutorials that you can follow along with.
But before you begin, make sure you have the following art supplies:
- A sketchbook: I use the Canson XL Mixed Media Sketchbook
- Graphite pencils: I use the Staedtler Mars Lumograph Pencils
- (Optional) Coloured sketching pencils: I use the Prismacolor Col-Erase Pencils
- Pens/Fineliners: I use the Copic Multiliners
- Erasers: I use the Faber-Castel Kneadable Erasers
1. Shading 3-Dimensional Objects
So, how do you start beginner sketching?
In my personal opinion, you should start with easy pencil drawings for beginners that focus on sketching and shading simple 3D forms.
Let’s start out by sketching a simple sphere:
- Draw a circle on your paper. Don’t worry about trying to make it look perfectly round
- Identify a light source. In the example below, I’ve chosen to place the light source in the upper left-hand corner. Since the light will shine on the upper left side of the sphere, you’ll keep this area fairly light. And since most of the light won’t shine on the lower right side, you’ll shade in this part of the sphere
- Start off by putting medium pressure on your pencil. Then, slowly transition to a lighter shade the closer you get to the light source. Keep a small section completely white, for this will be the highlight. For added dimension, sketch your lines in a curved manner to follow the contours of the circle
- Repeat step 4 as many times as you need to, each time building up the shadows until you reach your desired darkness. But make sure you leave a sliver of white space near the bottom right-hand of the sphere. This will represent the reflected light
- Once you’ve created a nice smooth gradient, it’s time to add the cast shadow. This is the dark shadow that is cast onto the surface that the sphere is sitting on. Shade in the area until it is dark. The shape of the shadow should be flat and somewhat squished
- When you’re done, try this drawing exercise several more times. With each new sketch, choose a different 3D shape and move the light source so that you have more variety in terms of light source positions
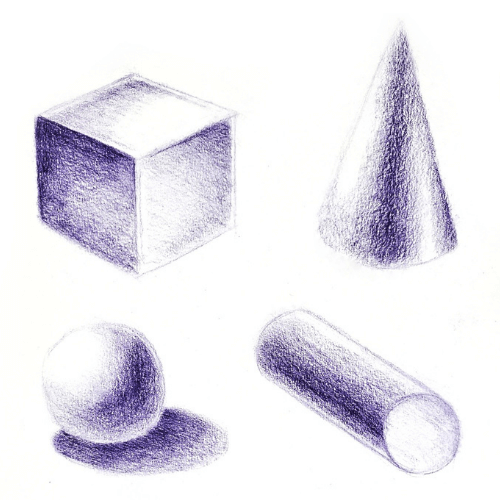
Takeaway: By learning how to sketch and shade simple 3D forms, you focus on learning the basics of form, light, and shadow. So check out this helpful blog post to learn about effective ways to improve your shading.
2. Easy Apple Drawing
Assuming you’ve already practiced drawing the spheres from the first drawing exercise, now you’re ready to try something similar but a little more challenging.
This second exercise is excellent when you’re
Now, you’re going to draw an apple. It’s spherical in shape, although the natural dips and textures of the skin give it a much more organic appearance than a simple sphere.
To get started drawing an apple, here’s what you need to do:
- Refer to the reference photo below, or take out a real apple and put it in front of your sketchbook. This will be your reference
- Observe the silhouette of the apple. Replicate that silhouette in your sketchbook using your pen or pencil. Draw softly by applying light pressure. Remember, you should be drawing from the shoulder, not the wrist, in order to create loose lines
- Once you’ve sketched the overall shape, chisel away at the silhouette by making it more defined. Apples are not perfect spheres, so it’s okay to add the natural dips and groves in the apple. Don’t forget to draw the stem, too
- Identify the light source. Keep the area closest to the light source white, whereas the opposite side of the object will receive the shadows
- Using small circular movements, begin shading the apple. Leave a tiny space at the bottom for the reflected light. Don’t press too hard the first time you lay down the graphite or coloured pencil. It’s easier to work in layers in order to build up the opacity
- Next, shade the gradient from light to dark to build up the intensity. You can pass over the apple as many times as you need too. Take note to follow the contour of the apple so that your pencil strokes are not straight and stiff
- You’re not adding a cast shadow this time, so finish up the details and you’re all finished
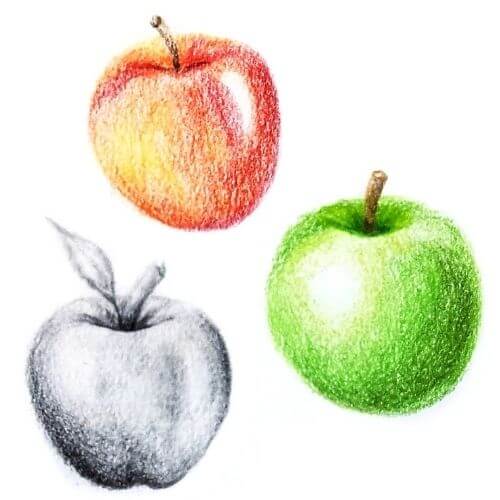
Takeaway: By shading an apple, you are learning how to transform a 2-dimensional outline into a 3-dimensional object. Try doing this with graphite, coloured pencils, and watercolour pencils.
3. Simple Leaf Sketches
Easy sketching for beginners often starts with simple objects such as leaves and flowers.
Leaves are really great to draw because they come in a variety of shapes and sizes.
What’s more, they have a lot of flow and movement, which means they’re perfect for helping you learn how to loosen up your sketching. Here’s how to get started:
- Refer to the leaf collage below and copy the leaves that you want to practice sketching
- Draw the stem of the leaf. This line is important because it is the foundation of the leaf from which all other points connect. Don’t draw a straight line. Instead, make it loose and flowy
- Draw veins that diverge from the main stem. Make sure these veins have a bit of a bend to them because all things in nature—including leaves, trees, and flowers—have S curves in their structure
- After you’ve drawn the veins, it’s time to sketch the outline of the leaf. Decide on how many points your leaf will have, and then start drawing curved lines to connect the steam to each leaf
- Using bends and curves in the shape of the leaf, draw as many points as you want. When you’re done, you can add a few more little veins
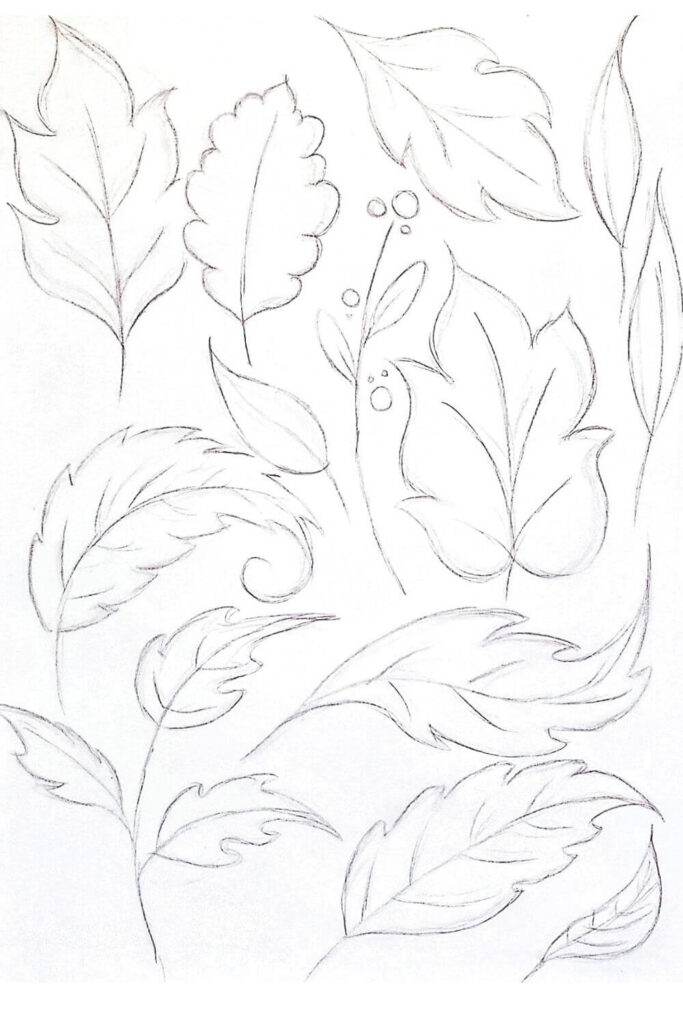
Takeaway: Drawing leaves is a great way to practice sketching loose lines with a natural flow. Check out this article for more tips to develop your skills as a self-taught artist.
4. Simple Landscape Sketch
Last but not least, it’s time to learn how to sketch simple landscapes.
In the 2 examples below, you’ll notice that neither landscape is super detailed. When sketching a landscape, you want to focus on the overall composition rather than obsessing over the small details.
As such, you’ll want to focus on where the horizon line is (this is the line where the sky and earth meet) and using different tonal values to suggest depth and distance.
Let’s get started:
- Choose 1 of the reference photos below. You will be replicating this landscape in your sketchbook
- Draw an X in the middle of your paper. You can see the lightly sketched X in the reference photos below. Use these lines as guiding lines to help you map out your composition.
- Identify the horizon line and sketch it lightly on your paper. If the line is higher on the page, then the focus of the landscape is on the earth. If the line is lower on the page, then the focus is on the sky
- Observe the landscape and start identifying major shapes. These can be rectangles, triangles, etc. Sketch them loosely onto your paper, and keep the guiding lines in mind to assure you’re drawing the proportions correctly
- Chisel away at the shapes by making the edges more defined. Keep in mind that you’re drawing nature, so the lines should remain loose and organic as opposed to blocky and straight
- Once the hills and mountains have been sketched, it’s time to shade the objects. Start shading the areas in shadow darker while preserving the white of the paper for the areas that receive the most sunlight
- When you have finished shading the different tonal values to suggest depth and distance, start adding the finer details including the trees and the grasses
- Keep in mind that we’re not aiming for photo realism, so it’s perfectly fine to draw simplistic trees and blades of grass. Add them to the landscape sketch, but don’t go overboard
- Observe your sketch and add darker values if you feel the piece needs more contrast. When you’re happy with the final result, stop and give yourself a pat on the back. You did it!

Takeaway: When sketching, don’t focus on realism and detailing. It’s more more important to focus on correct composition, drawing accurate shapes, and capturing the right tonal values to create depth and distance.
Bonus: More Easy Drawings for Beginners
Now that you’ve made it through 4 easy sketching ideas for beginners, I’ll leave you with a free list of easy and creative drawing prompts to help you find inspiration for things to draw.
It’s divided into 8 different categories with descriptive sketching ideas to get your creative engine running.
So if you’re interested in downloading this free file, just click the link below and it’s all yours!
How to Start Sketching for Beginners
To improve your drawing and sketching skills, it’s important to go over a few methods and techniques that I highly recommend you learn as a beginner.
Why?
Because these skills are fundamental. They’ll help you develop your art skills faster than artists who ignore them.
After all, at some point in your art journey you’ll be forced to go back to learn them later on.
So do yourself a favour and learn the fundamentals now.
Since I want to set you up for success from the beginning, I’ve created a short list of drawing skills that you should focus on in order to improve not only your skills, but the quality of your sketches.
Related: For more advice on skills you should incorporate into your daily art routine, check out this popular article.
Draw Loosely from the Shoulder
Do not draw from the wrist!
When you draw from the wrist, you’re more likely to grip the pencil too tightly. Remember, you’re learning to sketch.
So don’t hold your pencil tightly as if you’re writing. This makes you hold your fingers too closely to the pencil tip.
As a result, you develop a certain tightness that can make your sketches look too stiff and mechanical.
Therefore, my best advice is to draw from the shoulder.
When you draw, move your shoulder in long swooping motions. By drawing from the shoulder, your pencil strokes will look looser and more free-spirited.
This way, your drawings will have much more life and character when the lines appear loose and flowy.
Related: For more advice and expert tips about drawing, check out this ultimate drawing guide for beginners.
Look for General Shapes and Forms
Whenever you’re following easy drawing tutorials for beginners, it’s best to observe the overall shape of the object before you begin drawing it.
By observing the silhouette of the object, you’re gauging the shapes that you’ll need to draw. With these shapes in mind, you can break them down into smaller components, which will simplify the drawing process for you.
For example, if you’re drawing a house, you can break down the sketch as follows:
- Identify a rectangular shape for the body of the house
- Identify a pyramid for the roof
- Identify squares for windows and a rectangle for the door
- Identify curved or circular lines in the bushes along the house
- Identify patterns in the texture of the house, such as wood or bricks
Once you break down an object into its smaller components, you can sketch the entire base structure of the house to determine accurate proportions.
Then, you can add details to each section one step at a time.
The sketching process will be a lot easier to tackle because it will be simplified and more manageable. This strategy should help artists who struggle with perfectionism.
Focus on Interpretation, Not Copying
When you’re learning to draw or sketch something for the first time, you’ll need references to help you understand the shapes and forms of the object.
That being said, it’s good practice to not copy a reference line for line and stroke for stroke.
Why, you might wonder?
Because interpretation is an important part of artistry. You can reference an object, but unless you’re drawing photo realism, you should exercise the creative part of your brain to interpret what your eyes are observing.
By doing this, you are learning how to construe an object in your own unique way. As such, you’ll be learning how to develop your art style.
But if all you do is copy directly from a reference without experimentation and interpretation of your own, you’re going to quickly realize that you won’t be able to draw anything without a reference.
And that, my friend, means you’ll always need a crutch to rely on.
So do yourself a favour and use references for guidance, but make sure you change up the shading, light source, textures and so on to interpret those references in ways that resonate with you.
Study Light and Shadow
A lot of beginner artists skip learning the art fundamentals because they’re eager to begin creating masterpieces.
Unfortunately, skipping the fundamentals is going to set you up for failure and setback once you advance to a certain skill level.
Thus, you should learn about light sources from the beginning. After all, light touches every material object that exists.
As we already discussed, start by sketching simple 3D forms. Once you’re comfortable with these easy sketches, move on to more complex forms.
For example, you can study light and shadow on any of these more advanced drawings:
- A realistic tree to study how light and shadow appear on detailed bark and wood texture
- A glass jar to observe how light and shadow are cast on smooth glossy surfaces
- A human face to study the ways in which light and shadow are cast on the various body parts of the face
- Long wavy hair to observe how light and shadow are cast on forms that have many bends and curves
If you need more beginner instruction on studying light, check out this light and shadow guide by Drawpaintacademy.com.
Conclusion
Now that you’ve made it to the end of this easy sketching for beginners tutorial, I hope you have developed a greater understanding of drawing basics.
Remember, though, that it takes time and patience of develop the skills you’ve learned in this article.
The greatest takeaway is that in order to develop your sketching, you must spend time practicing the fundamental skills that we’ve discussed today.
That means learning how to draw when you don’t feel like it.
In time, your sketching skills will become more refined, and you’ll be able to moved on to more advanced drawings.
Just be patient, keep practicing, and sooner or later your sketches are going to look amazing!
What kinds of subject matter do you enjoy sketching? Share your preferences in the comments below!
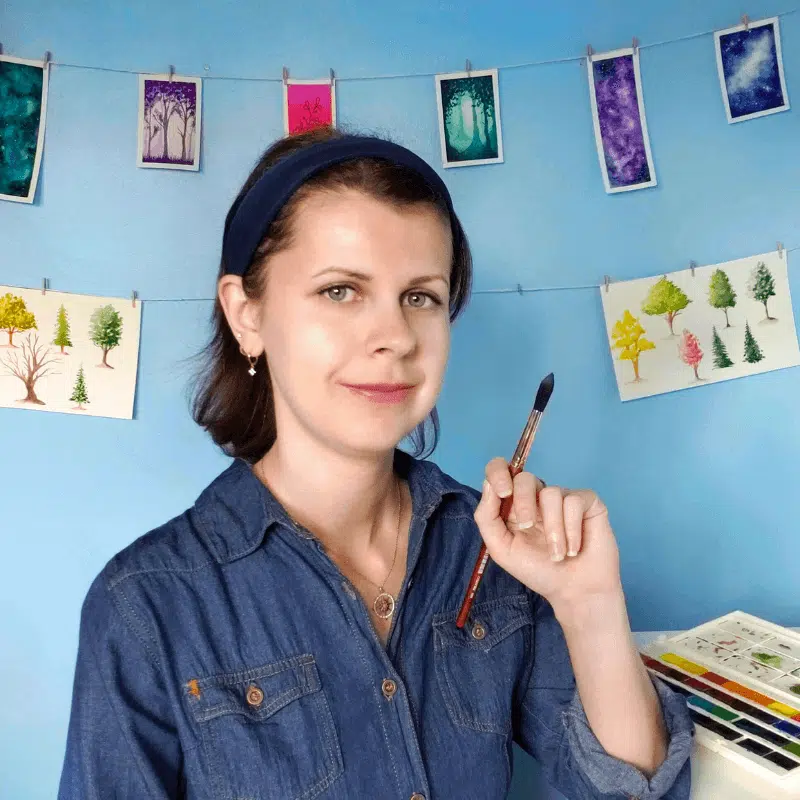
Miranda Balogh
Artist & Online Educator

This was super informative! Thank you! I have always struggled with shading.
Thank you! With consistent practice, I’m sure you’ll develop great shading skills.
Oh, I have always wanted to learn sketching. This helps!
I’m glad you found this article helpful! Give sketching a try; I’m sure you’ll find it enjoyable.
Super informative! I will be trying some new things the next time I sketch!
Have fun sketching!
I may start to draw again because of this! Lol! I love to draw especially sketching, but I’m not really good at it, that’s why when “doodles” or “doodling” became a trend I was really happy! Because,I can draw even if it’s not perfect.
But my heart is in sketching I guess. I will definitely try your tutorials here.
Thanks!
Sketching it a lot of fun because the goal is to learn and experiment as opposed to creating a polished artwork. If you start sketching again, I wish you the best of luck!
I love this article—so many great tips.
The tip about “Draw Loosely from the Shoulder” was extremely helpful. I definitely hold my pencil too tight.
Thanks.
I’m glad you enjoyed reading this article! I used to hold my pencil too tightly, too. But when I started drawing from the shoulder as opposed to the wrist, it completely changed the way I approached sketching because my lines much looked more loose and natural. So I’m glad you found this piece of advice particularly useful; I’m sure it will serve you well.
I remember learning this in when I was younger in my art class. I have enjoyed drawing so much when I was younger. Sketching is so much fun.
I agree, sketching is a lot of fun! Thanks for sharing your thoughts.
This is so awesome. Thank you. I’ll definitely be trying these.
Thank you! I’m sure you’ll have fun sketching these things.
What an excellent and detailed post on learning the basics of sketching. My wife and daughter both are creative and would enjoy viewing these helpful tips. Will definitely pass this on to the two of them. Great job and thanks for sharing your knowledge! 🙂
Thank you for leaving such a lovely comment! I appreciate it.
It’s so great to see instructions written down for a change! I was just chatting with other members of the disabled community on Twitter the other day about how frustrating it is that almost everyone uses video nowadays, and for many of us (in and out of the disabled community) text is much easier to absorb. So thank you!
I did realize how beneficial text could be for the disabled community, so thank you for educating me on this matter. I will continue to publish written content so that those who prefer text can get the information they need in the format they prefer. Thanks for sharing this important information!
Thank you so much for your 4 step tutorial for beginning sketches. I have been inspired by my 15 yr.old grandson who is a talented self-taught artist of a variety of mediums. I bought art supplies to see what I could do but did not know where to even begin. Well until now! 🙂 So glad I found your well put together and detailed tutorial for beginners. I am now ready to begin!!! Thank you so much!
I’m so glad to hear that you’re taking up art as a hobby! It’s so relaxing and fun, so I’m sure you’ll enjoy it. So have fun learning from the tutorials and thank you for sharing your story!
Miranda, thank you for sharing your knowledge on drawing, shading and light. I’ve been doing watercolor for about three years now. I have a brother who is an artist, watercolor and sculptor of wood, bronze and glass. He has lived off his art nearly his whole adult life. I thought if he has that talent, perhaps I might have a little. LOL! My real expertise is in sewing and knitting. My favorite things to draw are birds, animals, trees and ocean scenes. I have enjoyed the articles you put out and never cease to learn something from you. Thanks again for sharing.
Mary
Hi, Mary! Thank you for your kind words. I’m glad to hear that you’re enjoying making art and learning new skills. You and your brother are so artistic!