When you first start painting with watercolours, it can be hard to determine what are the best watercolour tutorials for beginners.
So, you spend lots off time browsing through YouTube tutorials, but they’re often too difficult.
Or you find a lovely watercolour tutorial on Pinterest, just to find out that you have no idea how to apply those advanced techniques.
That’s why, in this article, I’m saving you time and energy by sharing 5 beginner-friendly tutorials and tons of watercolour hacks so that you will be able to:
- Follow free watercolour tutorials step-by-step to create easy watercolour paintings that you’ll be proud of
- Understand which skills and techniques are the most important to develop as a beginner watercolour artist
- Invest in the best watercolour supplies that are good-quality and suitable for beginners
By the time you’re done reading, you’ll have a bunch of easy and fun watercolour tutorials to help you improve your skills!
DISCLOSURE: This page contains affiliate links. If you make a qualified purchase using any of the links, I’ll earn a small commission at no extra cost to you. I appreciate every sale because it allows me to create free content to promote the growth of this website.
Table of Contents
1. Easy Watercolour Tutorials for Beginners: Galaxy
Watercolour galaxies are one of my favourite things to paint! Creating these nebulous paintings gives you ample opportunity to practice the wet on wet technique.
Here’s how to create your own stunning galaxy painting:
- Choose 3 colours plus black or Payne’s grey
- Using a large brush, wet the entire background of your sky. The perfect balance between paint and water creates a light glossy sheen on the paper that is free of water drops or pools
- Take your first colour and dab it onto the wet surface. The pigment should flow loosely across the page. Do this again with the other 2 colours, but omit the black for now. Wait for the paint to dry
- Once the paint has completely dried, use your large brush to wet the entire surface of the paper again. Repeat step 3 by adding a second layer of paint to the sky. This combination of colours is called a variegated wash
- Before the pigments have dried, dab some black paint around the edges of the painting to create the depth of space. Start off lighter and add more paint as you go to darken the sky to your desire. Wait for the paint to dry
- Once the layer has dried, you can take white ink or white gouache to splatter stars across the sky. Simply water down the ink or gouache, load up your brush, and gently tap another paintbrush against the one you’re holding. The tapping motion will release the pigment to create a splatter of little dots. Wait for the stars to dry

Takeaway: The wet on wet technique is one of the most commonly used watercolour techniques. Therefore, it’s necessary that you learn how to control the washes early on in your watercolour career.
2. Monochrome Watercolour Painting
In this tutorial, you’ll learn how to paint a mountain landscape using only one colour: purple.
This style of art is called monochrome, meaning the artist uses the tonal values of a single hue to create a painting.
The goal is to focus on using tonal variation to create contrast between highlights and shadows.
Watch the art video below and follow along to the step-by-step instructions to learn how to paint monochrome mountains.
Takeaway: Practice creating monochrome paintings using different colours so that you can learn about each pigment’s range of tonal values.
3. Easy Watercolour Roses (Minimalist Style)
Practicing along with watercolour tutorials of flowers is an excellent way to practice your brushstrokes.
By focusing on your brushstrokes, you’ll learn about how much pressure to apply to create strokes of different variations.
The general rule of thumb is that more pressure on the brush will create thicker and wider brushstrokes.
Conversely, putting light pressure on the brush will create thinner and narrower brushstrokes.
Now that you know how to manipulate the size and width of your brushstrokes, have a look at the first watercolour project.
- Choose a colour for your roses. Then dilute the paint with a little bit of water in your mixing well
- Apply the wet on dry technique by dragging the brushstroke across the dry paper. Then, apply medium pressure to create a C curve
- Reload the brush with more water and pigment. Create another brushstroke near the first one, and curve it in a similar C curve
- Go around the rose and repeat the process, but make sure some white space is between the various petal sizes so that the rose looks organic
- When you’re done, wait for the rose to dry. Repeat steps 1 – 4 to practice creating multiple roses of several different colours
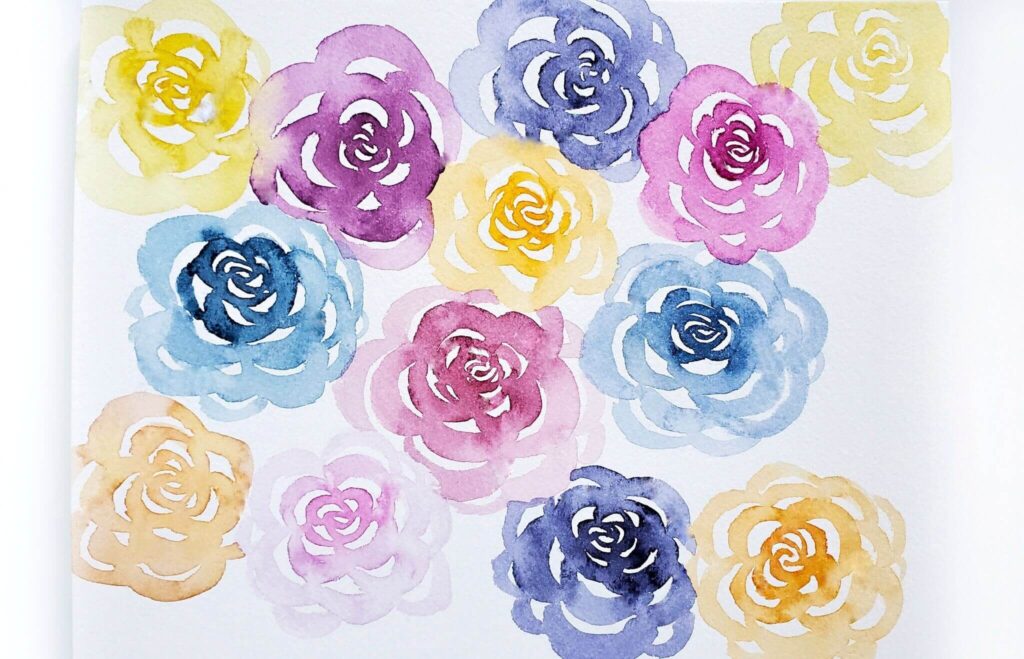
Takeaway: Practicing minimalist watercolour roses helps you develop control over your paintbrush. Learning how to vary your brushstrokes is one of many useful watercolour tips that will improve your paintings.
4. Simple Watercolour Landscape
This last watercolour tutorial for beginners is also fairly easy and straightforward to create.
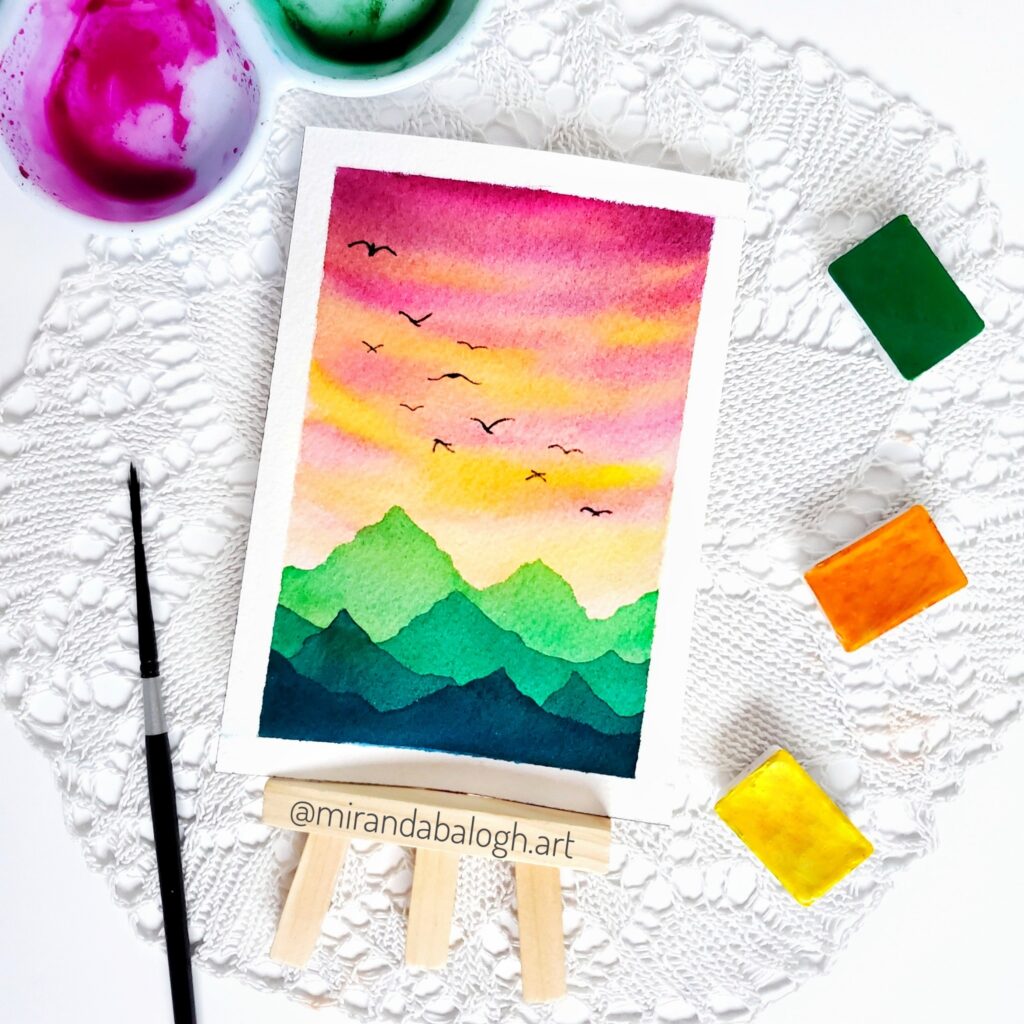
In this tutorial, you’re going to paint a simple mountain landscape in which you’ll paint multiple layers of mountains to create depth.
This tutorial is great for helping you learn how to layer paints properly, as well as how to appreciate the transparent nature of watercolour. Let’s begin:
- Using any colours you desire, paint a simple background which will function as the sky. You can either create one solid colour, or use 2 colours to create a gradient wash. In my example, I’m using a combination of pink and orange. Let the background layer dry
- Water down your green pigment and then load up your brush. Paint a light wash of mountains near the middle to lower third of the paper. Vary the mountaintops so that the mountains look organic. Wait for the layer to dry
- Next, add some more pigment to your mixing well to darken the colour. Load up your brush and paint the second layer. Mountains in the background are lighter, and mountains in the foreground are darker. So paint the second layer on top of the first and vary the heights again so that they look natural. Wait for the pigment to dry
- Repeat step 3 once again. You can add as many mountain layers as you like, just make sure the closer the mountain is, the darker is appears. Once you’re done, wait for the last layer to dry
- To add a bit more visual interest to your painting, you can use black paint or black ink to draw some little birds flying over the landscape
Related: Check out this article to learn about the importance of vibrancy, luminosity, and transparency in watercolour paintings.
5. Loose Watercolour Trees
Painting watercolour trees helps you learn about colour mixing.
Because doing so encourages you to experiment with mixing blues and yellows to make interesting hues of green.
Or mixing yellows and reds to make warm tones for autumn trees.
You can get started by choosing your favourite blue and yellow paints. Here’s what you need to do next:
- In your mixing palette, add a bit of water to your blue and yellow pigments. Make sure they are in separate wells. Then, in an empty well, add some yellow pigment and a hint of blue. Mix the 2 colours until you achieve your desired green hue
- Next, paint the stem of your tree by painting a line on your page. For a more natural appearance, make sure the tree is not a straight line. Adding some bends or curves gives the tree an organic look
- Using your brush, apply light pressure to create multiple branches. When you’re done, the tree should be bare. Let it dry
- After, load up your brush with the lovely green mixture and start dabbing your brush in random strokes all across the branches to create leafy foliage. Vary the size and shape of the leaves. Then allow the paint to dry
- Repeat step 4 a second time. However, this time you want to add more blue to the mixture in order to create a darker green. Dab the paintbrush in loose random strokes in the areas where you want the shadows to appear, such as near the bottom of each grouping of leaves. Wait for the paint to dry
Paint as many watercolour trees as you desire. In fact, I encourage you to fill up your page with different colour combinations.
Experiment with warm tones and cool tones to create trees that reflect the different seasons.
If you’d like, mix a little but of blue into orange to create a lovely brown and just practice creating bare winter trees.
Play around with colour mixing by experimenting with various hues and tones. Practicing this way will help you learn how to avoid muddy colours.
The Best Watercolour Supplies to Invest In
As a beginner, you need to make sure that you have all the necessary watercolour supplies for painting.
By investing in good art supplies early on, you’ll save yourself a lot of stress and frustration that you may experience if you choose inferior or low-quality products.
So here are my top recommendations for you if you’re looking for the best beginner-friendly watercolour tools.
Recommended Watercolour Paper
For the best results and easiest painting process, you should invest in 100% cotton paper because the paper will be thick and sturdy enough to handle multiple washes of paint.
If you’re on a budget and can’t afford 100% cotton paper, you can purchase the Canson Watercolour Paper. This was the first paper I used, and it worked well enough for simple watercolour tutorials.
Canson Watercolor Paper
• 140 lbs / 300 gsm paper that’s thick enough to handle water and layering
• Acid-free paper, so the paper shouldn’t turn yellow
• Paper works well for watercolours and mixed media art
BUY ON AMAZONHowever, if you’ve been struggling to paint on cheaper wood pulp or cellulose paper, and you want to upgrade to higher-quality paper, then I suggest investing in a 100% cotton paper by Arches.
Yes, it’s a bit pricy, but the quality of your paintings will look superior. Also, your watercolour painting process will be so much smoother and enjoyable since the paper won’t really warp and buckle.
Arches Cold-Pressed Watercolor Paper
• 100% cotton paper is super water absorbent and ideal for watercolours
• 300 gsm (140 lbs) is thick paper, so it can handle many layers of pigment
• Acid free: Your paper won’t turn yellow
BUY ON AMAZONRecommended Watercolour Brushes
After much experimentation, I believe the best afforable brushes are the Black Tulip watercolour brushes by ZenArts.
You can buy a set of 6 different brushes including round, flat, Cat’s Tongue, and rigger shapes.
The bristles are synthetic, but they are made to mimic real animal hair bristles. As such, the tips hold their shape very well and they’re able to absorb a good amount of paint and water.
Black Tulip Watercolour Brushes
• Comes with 6 assorted brushes that are suited for beginners
• Made from synthetic squirrel fibers that mimic the real animal hair
• Flexible brushes with lots of versatility
BUY ON AMAZONOn the other hand, if you’re looking for higher-quality brushes that hold lots of water and pigment, and which have incredible brushstroke variation, then I suggest you invest in the Silver Black Velvet Brushes.
I rave about these brushes all the time because they are a blend of synthetic and real squirrel hair. That means you have all the advantages of versatile animal hair bristles, but the synthetic blend lowers the price point to a very reasonable price.
Silver Black Velvet Watercolour Brushes
• Comes with a size 6 round brush, size 12 round brush, and 1 inch flat brush
• Made from a superior blend of squirrel hair and synthetic fibers
• Fine points, soft bristles, and fibers hold a lot of water
BUY ON AMAZONRecommended Watercolour Paint
As a watercolour beginner, you might be tempted to purchase a super cheap paint set from the dollar store. I highly recommend against this, as the paints will be very chalky, dully pigmented, and they won’t mix very well.
Instead, invest in a good student grade watercolour set such as the Winsor & Newton Cotman set of 12 colours. The pigments are vibrant, they lay down smoothly, and they mix well.
The limited palette encourages you to learn about colour mixing, and the paint pans come in a small, light, and portable palette which is perfect for plein air painting.
Winsor & Newton Cotman Watercolors
• 12 vibrant pigments that blend and mix well together
• Small box that’s lightweight, portable, and convenient to carry
• Very affordable set that’s suitable for all beginners
BUY ON AMAZONAlternatively, if you’re looking to invest in artist grade paints, but you don’t want to spend an arm and a leg, then I suggest you check out the White Nights paints.
These paints are my personal favourites because they are richly vibrant, they lay down smoothly on the paper, and they blend well together. Also, they come in full pans, which means the paint will last for a very long time.
What’s more, these paints are professional quality, but they are much more affordable than other well-known artist grade paints on the market. In this way, they are very affordable.
White Nights Watercolours
• 36 large pans with a diverse range of watercolour pigments
• The vibrant pigments blend easily and have very smooth application
• Box comes with useful and detailed pigment information
BUY ON AMAZONConclusion
There are many watercolour tutorials for beginners out there that are simple, easy, and straightforward to follow.
What’s important is that you don’t just copy the tutorials: you need to develop an understanding of which skills you’re developing and which techniques are worth learning.
Now that you’ve learned the basics, I believe you’re ready to paint full watercolour paintings that are suitable for a beginner painter.
So if you’re interested, check out any of these watercolour tutorials to follow step by step instructions with guided pictures to help you create your own paintings:
- How to Paint Beautiful Night Sky Paintings (Watercolour Tutorial)
- Easy Monochrome Painting for Beginners (Watercolour Tutorial)
In time, you’re definitely going to transform from a beginner into an expert watercolour artist. I believe in you!
Have you tried any of these easy watercolour tutorials? Which one is your favourite? Share your opinion in the comments below!
Miranda Balogh
Artist & Online Educator







Instructions were very descriptive and easy to follow. Thank you for sharing!
Thank you! I’m glad you liked these watercolour tutorials.
Great post! I’ve always had a hard time with watercolors. Your tutorial is really thorough. I’ll have to try it again. 🙂
Never give up! With some more practice, I’m sure you’ll succeed!
Thanks Miranda for this info. I’ve learned a lot from your instructions. Will pin this post. I wish you a colorful day!
Thank you! I hope you have a colourful day, too!
Would love to explore watercolours. These are beautiful examples.
Watercolour is a lovely artistic medium. So if you have the chance, definitely take some time to explore this activity!
Great post with such useful information. My father really loves painting so I’ll share the post with him.
Thank you! I’m glad that you thought this article would be a good resource for a fellow artist.
Ooh, excited to try the roses out! I want to try watercolour again, as the last time I did was probably almost a decade ago. I was very tempted to buy a cheap set from the dollar store, but ended up buying one from Michaels. I wish I read this tutorial sooner though! I would’ve chosen the one you recommended. 🙂
It sounds exciting to pick up an old hobby. I hope you have fun painting with your new watercolours!
Awesome, thorough post! I’m just recently getting into watercolors after years of working with oil paints. This was very helpful!
Oh, making the jump from oil to watercolour paints sounds exciting! I’ve never used oil paints, but I imagine the process is quite different from watercolours. So have fun learning about this wonderful transparent medium.
These look like something my daughter and I could have success with. Bookmarking these to come back to during summer vacation time!
I’m positive that anyone, regardless of age or skill level, will have success painting these easy watercolour tutorials. So I hope you both have tons of fun painting them!
Really enjoyed this and can’t wait to get started!
Thanks! I’m glad to hear that.
These look easy enough to implement and try. I’ll definitely tag you once I create something.
Sounds good! I look forward to seeing your watercolour painting!
Great tutorials! I love the galaxy one! They look so amazing! I’m going to have to try these out! Thanks so much for this info!
The watercolour galaxy tutorial is a lot of fun because it’s so unpredictable and chaotic. I hope you have fun painting!